Customizing Labels, Messages, and URLs
Do you want to change various labels and messages in BuddyPress, but don’t want to hack the core files to do so? This page explains how to use a language translation file to customize BuddyPress labels, messages, and URL slugs.
Note: This is not intended for full language translations. If you intend BuddyPress to be used in a language other than English, see the Language Translations page.
Why use a language file?
The most compelling reason to use this method of changing labels and messages is to avoid hand-changing labels and messages in plugin and theme files. Even though theme customizations are recommended and encouraged, it is nice to have your customizations in one place. Overall, creating a custom language file is a better long-term solution than hand-changing plugin or theme files since you can make changes in one place for all labels and messages used in BuddyPress.
Labels and Messages
Here are the steps to create your own custom messages and labels without doing a full language translation.
This example uses en_US as the sample language definition and thus buddypress-en_US.mo is the name of the language file you will create. You’ll need to replace ‘en_US’ with the locale of your WordPress site.
1. Create a customized PO file
Open the POT file in wp-content/plugins/buddypress/buddypress.pot, make a copy of the file and rename it to buddypress-en_US.po.
Then make the changes you want in a text editor or by using a specialized language localization editor like PoEdit (this is recommended if you are not comfortable using a text editor to make changes to the .po file).
Save your .PO file and generate a .MO file. The .MO file should be similarly named – buddypress-en_US.mo.
2. Uploading the PO and MO files
Now that you have generated your .MO file, move both the PO and MO files to /wp-content/languages/plugins/ on your server.
If the /wp-content/languages/plugins/ folder does not exist, create it!
3. Load the MO language file
WordPress 4.6 changed how language files are enqueued, preferring the GlotPress-provided “canonical” language file over a custom language file. The simplest way to make sure your new .mo file will be used is via a plugin available on the WordPress plugin repository: WPT Custom Mo File. Once you’ve activated the plugin, visit WP Admin > Tools > WPT Custom Mo File to upload your custom .mo file.
4. Test and verify your changes by loading BuddyPress.
Translating with PoEdit
PoEdit is a lightweight application for editing and creating .po and .mo files.
If you are not comfortable working at the command line then it is highly recommended to use this application.
You can download PoEdit from http://www.poedit.net/download.php.
1) Download, install and start PoEdit
2) Select the BuddyPress translation file
On the main menu select “File > New catalog from POT file”, navigate to the BP languages folder (/wp-content/plugins/buddypress/bp-languages/)and select the ‘buddypress.pot’ file.
This will open a settings dialog and you will be asked to fill in some details such as project name which we’ll skip.
Click on ‘OK’ and you’ll be asked to save your language file.
Save your language file as “buddypress-en_US.po”. If you’re using a different language on WordPress, change “en_US” to the locale of your WordPress install.
3) Changing strings and saving the changes
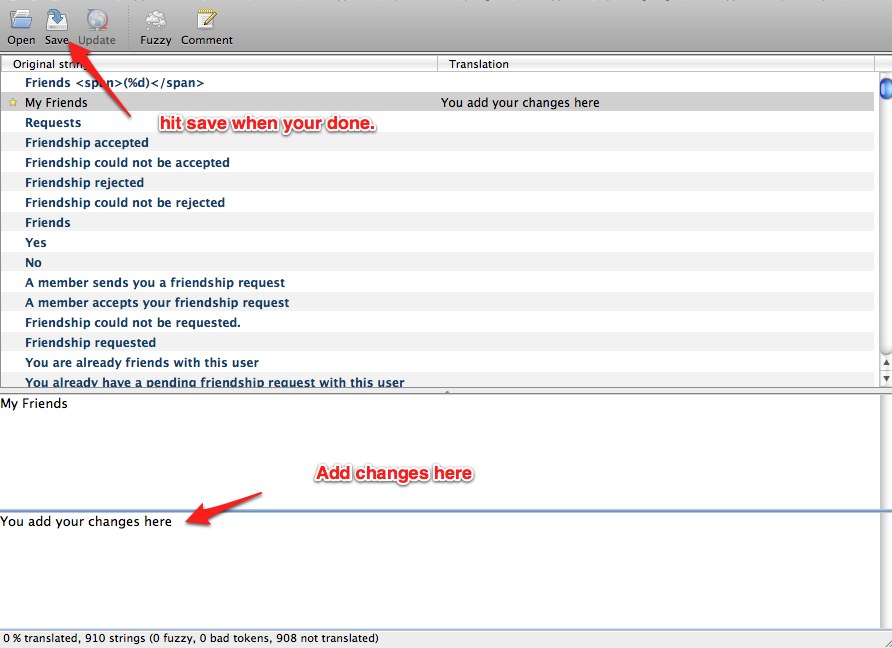
Now, you will see a list of all the BuddyPress language strings you can modify.
Click on any string you wish to change and make the adjustment in the bottom half of the screen.
Go ahead and repeat this process for the other labels you want to change and when you’re done, hit “Save”.
4) Uploading the PO and MO files
Updating your custom language file
When a new version of BuddyPress is released, a new BuddyPress POT file is generated.
To remain up-to-date, you will need to merge this new file with your custom .po catalog.
You can do this by following these instructions:
1) Start PoEdit and go to “File > Open”. Select your custom .po catalog file you created.
2) Now, go to “Catalog > Update from POT file…”, and navigate to the /plugins/buddypress/buddypress.pot file (For older versions of BuddyPress, this file is located at /plugins/buddypress/bp-languages/buddypress.pot).
3) Opening the file will show an “Update Summary” window, which shows you the new strings added and the obsolete strings that will be removed. Click on “OK” and these changes will be merged into your .po file.
4) Then, simply save your catalog file once more to generate a new .mo file.
Slugs
For example, if you are running a sports website with BuddyPress, you could rename the URL slug example.com/members to example.com/players by changing the url of the corresponding component page in the WordPress admin -> pages.
To change slugs on the sub nav on a member page add these defines to a file bp-custom.php and place this file in /plugins/bp-custom.php
define( 'BP_SETTINGS_SLUG', 'settings' );
define( 'BP_XPROFILE_SLUG', 'profile' );
Loco Translate – Plugin solution
Loco Translate allows site admins to modify WordPress translations files of any theme and any plugin within the WordPress Dashboard. It also provides localization tools for developers, such as extracting strings and generating templates.
Go to Loco Translate plugin page
Notes
This is not intended for full language translations. If you intend BuddyPress to be used in a language other than English, see the Language Translations page.
This solution is arguably better than using the define ( 'WPLANG', ''); declaration in your wp-config.php file since we are really just trying to customize BuddyPress and not WordPress MU as a whole.
This page was inspired by a forum topic on BuddyPress.org called I want to speak Spotlish. View that thread for discussion and other suggestions.