A closer look to the following BP_Attachment methods.
<?php
/**
 * BP Attachment class
 */
abstract class BP_Attachment {
	public function __construct( $args = '' ) {}
	public function set_upload_dir() {}
	public function create_dir() {}
	public function upload( $file, $upload_dir_filter = '' ) {}
	public function upload_dir_filter() {}
	public function validate_upload( $file = array() ) {}
}
The __construct() method
This is the method you will use to define all the needed parameters to manage the user uploads for your plugin. To do so, you can directly set these parameters inside the __construct() method of your class.
<?php

if ( class_exists( 'BP_Attachment', false ) ) :

class Custom_Attachment extends BP_Attachment {
	public function __construct() {
		// Set the Custom Attachment parameters
		parent::__construct( array(
			'action'                => 'custom_upload',
			'file_input'            => 'custom_file',
			'original_max_filesize' => 512000,
			'allowed_mime_types'    => array( 'png', 'jpg' ),
			'upload_error_strings'  => array(
				9  => __( 'Your file name must contain the term “custom”', 'custom-domain' ),
			),
			'base_dir'              => 'custom',
		) );
	}
}

endif;
Or you can pass an array containing these specific parameters when you instantiate your class.
<?php

if ( class_exists( 'BP_Attachment', false ) ) :

class Custom_Attachment extends BP_Attachment {
	public function __construct( $args = array() ) {
		// Set the Custom Attachment parameters
		parent::__construct( $args );
	}
}

endif;

$custom_attachment = new Custom_Attachment(
	array(
		'action'                => 'custom_upload',
		'file_input'            => 'custom_file',
		'original_max_filesize' => 512000,
		'allowed_mime_types'    => array( 'png', 'jpg' ),
		'upload_error_strings'  => array(
			9  => __( 'Your file name must contain the term “custom”', 'custom-domain' ),
		),
		'base_dir'              => 'custom',
	)
);
Setting the parameters for your class
$action- This parameter is required. It’s a string carrying the upload action used when uploading a file, the
$_POST['action']must be set to this parameter. $file_input- This parameter is required. It’s a string to inform about the name attribute used in the file input of your upload form.
$original_max_filesize- This parameter is optional. It’s an integer informing about the max upload filesize allowed in bytes, it defaults to
wp_max_upload_size() $allowed_mime_types- This parameter is optional. It’s an array informing about the list of allowed extensions, it defaults to WordPress allowed ones
get_allowed_mime_types(). NB: in multisite configurations, allowed mime types are restricted to theupload_filetypessite option (Seecheck_upload_mimes()in related resources). $upload_error_strings- This parameter is optional. It’s an array containing the feedback messages for your custom validation rules. The index of the array is starting at nine because BuddyPress is already taking care of some feedback messages (index 0 to 8) in case an error occured during the upload process.
$base_dir- This parameter is optional. It’s a string to inform about the
/wp-content/uploads‘s subdirectory to write the uploaded files to.
Depending on your needs, you can simply use the __construct() method and its required parameters or override some other BP_Attachment methods to match more advanced needs. We advise you to define a $base_dir to separate your attachments from WordPress ones. Below is a very basic example of use.
<?php
// Display the form
function custom_attachment_display_form() {
	?>
	<form action="" method="post" id="custom-upload-form" class="standard-form" enctype="multipart/form-data">
		<?php
		/**
		 * $action: the upload action used when uploading a file.
		 *          the $_POST['action'] must be set to this parameter.
		 */
		$action = 'custom_upload';
		?>
		<input type="hidden" name="action" id="action" value="<?php echo esc_attr( $action ) ;?>" />

		<?php
		/**
		 * $file_input: the name attribute used in the file input of the upload form
		 */
		$file_input = 'custom_file';
		?>
		<input type="file" name="<?php echo esc_attr( $file_input ) ;?>" id="custom-file-id" />
		<input type="submit" name="upload" id="upload" value="<?php esc_attr_e( 'Upload File', 'custom-domain' ); ?>" />
	</form>
	<?php
}

/**
 * Assuming you have defined your attachment class and a function to
 * intercept the submitted form.
 */
function custom_attachment_handle_upload() {
	// Let's get ready to upload a new custom attachment
	$custom_attachment = new Custom_Attachment();

	/**
	 * Everything is in place to upload the file
	 * @see Custom_Attachment->__construct()
	 *
	 * eg:
	 * - $action     'custom_upload',
	 * - $file_input 'custom_file'
	 * - $base_dir   '/wp-content/uploads/custom'
	 */
	$result = $custom_attachment->upload( $_FILES );

	// Define a custom redirect inside a BuddyPress page
	$redirect = trailingslashit( bp_loggedin_user_domain() );

	/**
	 * If there's an error during the upload process
	 * $result will be an array containing the error message
	 */
	if ( ! empty( $result['error'] ) ) {

		// Add a feedback message containing the upload error
		bp_core_add_message( $result['error'], 'error' );

		// Safely redirect the user
		bp_core_redirect( $redirect );

	/**
	 * If the file was successfully uploaded
	 * $result will be an array containing the path to the file,
	 * its url and its mime type.
	 *
	 * array {
	 *	$file Absolute path to the file
	 *	$url  Absolute url to the file
	 *	$type the file mime type
	 * }
	 */
	} else {
		// Add a feedback containing the success message
		bp_core_add_message( __( 'Bingo! file successfully uploaded., 'custom-domain' ) );

		/**
		 * In our example, the result could be:
		 * array {
		 *	'file' => ABSPATH . 'wp-content/uploads/custom/custom_image.png',
		 *	'url'  => 'http://site.url/wp-content/uploads/custom/custom_image.png',
		 *	'type' = 'image/png',
		 * }
		 */

		// Safely redirect the user
		bp_core_redirect( $redirect );
	}
}
The set_upload_dir() method
This method will set the $upload_path (path to your upload dir) and $url (url of your upload dir) properties of your class. You shouldn’t need to override it from your extending class. If you defined a $base_dir in your __construct() method, then it will also create this specific dir using the create_dir() method.
The create_dir() method
This method will create the $base_dir in /wp-content/uploads to write the uploaded files to, if you defined this particular parameter in your __construct() method. If you need to do some specific actions when creating your base dir, you can override this method. For instance, you could add an .htaccess file to protect your files in Apache servers. Below is a way to achieve this:
<?php

if ( class_exists( 'BP_Attachment', false ) ) :

class Custom_Attachment extends BP_Attachment {
	public function __construct() {
		// Set the Custom Attachment parameters
		parent::__construct( array(
			'action'                => 'custom_upload',
			'file_input'            => 'custom_file',
			'base_dir'              => 'custom',
		) );
	}

	public function create_dir() {
		// Create the dir using the BP_Attachment->create_dir() method
		$created = parent::create_dir();

		// if directory was created, create the .htaccess file
		if ( $created && ! file_exists( $this->upload_path .'/.htaccess' ) ) {
			// Define the rule to protect uploads dir in Apache servers.
			$rules = array( 'Order Allow,Deny','Deny from all' );

			// make sure to load the file where the insert_with_markers() function is located
			require_once( ABSPATH . '/wp-admin/includes/misc.php' );

			// create the .htaccess file
			insert_with_markers( $this->upload_path .'/.htaccess', 'Custom Attachments', $rules );
		}
	}
}

endif;
The upload() method
This method will upload the file into the $upload_path directory defined within your class. You shouldn’t need to override it from your extending class. Just before using the WordPress function wp_handle_upload(), The method is including a filter 'bp_attachment_upload_overrides' to edit/add some upload $overrides if you need to.
$file- This parameter is required. It’s an array, the
$_FILESsuperglobal. $upload_dir_filter- This parameter is optional. It contains the callback function name to override the BP_Attachment included filter that is setting the specified
$base_dir(see your__construct()method) as the destination folder for the uploaded files (see theupload_dir_filter()method). If you define this parameter, you’ll need to create a specific function to filter'upload_dir'(seewp_upload_dir()in related resources).
upload_dir_filter() method
If you haven’t specified the $upload_dir_filter parameter when uploading your file and if you set a $base_dir parameter from your __construct() method, this function will take care of filtering the WordPress upload dir to use your specific $upload_path. If you need to add some specific organisation into your upload dir, you can override this method like this.
<?php

if ( class_exists( 'BP_Attachment', false ) ) :

class Custom_Attachment extends BP_Attachment {
	public function __construct() {
		// Set the Custom Attachment parameters
		parent::__construct( array(
			'action'                => 'custom_upload',
			'file_input'            => 'custom_file',
			'base_dir'              => 'custom',
		) );
	}

	/**
	 * Optional, use it if you need to do some custom actions in the upload directory
	 * eg: add a subdirectory for each user ids
	 */
	public function upload_dir_filter() {
		/**
		 * You can use the BP_Attachment->upload_dir_filter() function to get
		 * your custom upload dir data
		 *
		 * if you defined the $base_dir parameter in the construct method
		 *
		 * you will get: array(
		 * 	'path'    => 'site_path/wp-content/uploads/custom',
		 * 	'url'     => 'site_url/wp-content/uploads/custom',
		 * 	'subdir'  => false,
		 * 	'basedir' => 'site_path/wp-content/uploads/custom',
		 * 	'baseurl' => 'site_url/wp-content/uploads/custom',
		 * 	'error'   => false
		 * );
		 */
		$upload_dir_data = parent::upload_dir_filter();

		if ( ! is_user_logged_in() ) {
			return $upload_dir_data;
		}

		/**
		 * Or you can dynamically set your custom upload dir data
		 * eg: /wp-content/uploads/custom/1
		 */
		return array(
			'path'    => $this->upload_path . '/' . bp_loggedin_user_id(),
			'url'     => $this->url . '/' . bp_loggedin_user_id(),
			'subdir'  => '/' . bp_loggedin_user_id(),
			'basedir' => $this->upload_path . '/' . bp_loggedin_user_id(),
			'baseurl' => $this->url . '/' . bp_loggedin_user_id(),
			'error'   => false
		);
	}
}

endif;
The validate_upload() method
If the $original_max_filesize parameter was set in your __construct() method, the file size will be checked using the BP_Attachment->validate_upload() method. This method can be overriden within your custom class if you need to add some custom file validation rules. NB: If you plan on using custom validation rules, don’t forget to create the corresponding custom error messages using the $upload_error_strings parameter from your __construct() method.
$file- This parameter is required. It’s an array containing the temporary file attributes (before it has been moved).
The following example checks the name of the uploaded file contains “custom”.
<?php

if ( class_exists( 'BP_Attachment', false ) ) :

class Custom_Attachment extends BP_Attachment {
	public function __construct() {
		// Set the Custom Attachment parameters
		parent::__construct( array(
			'action'                => 'custom_upload',
			'file_input'            => 'custom_file',
			'base_dir'              => 'custom',
			'upload_error_strings'  => array(
				9  => __( 'Your file name must contain the term “custom”', 'custom-domain' ),
			),
		) );
	}

	/**
	 * Optional, use it if you need to add some custom validation rules
	 * in our example: the file must contain "custom" in its name
	 */
	public function validate_upload( $file = array() ) {
		/**
		 * You can use the BP_Attachment->validate() function to check
		 * for your max upload size
		 */
		$file = parent::validate_upload( $file );

		// Bail if already an error
		if ( ! empty( $file['error'] ) ) {
			return $file;
		}

		/**
		 * The file name is not containing 'custom', add a reference
		 * to the index of your $upload_error_strings array containing the
		 * feedback message
		 */
		if ( false === strpos( $file['name'], 'custom' ) ) {
			$file['error'] = 9;
		}

		return $file;
	}
}

endif;
A sample plugin to add Attachments to private messages
To illustrate how to extend the BP_Attachment class, this sample plugin (Do not use it on a production server!) is using what we’ve learnt in the previous section to allow users to “attach” a file to their private messages.
- This is the Custom_Attachment class for the sample plugin
- This is the function to handle uploads for the sample plugin
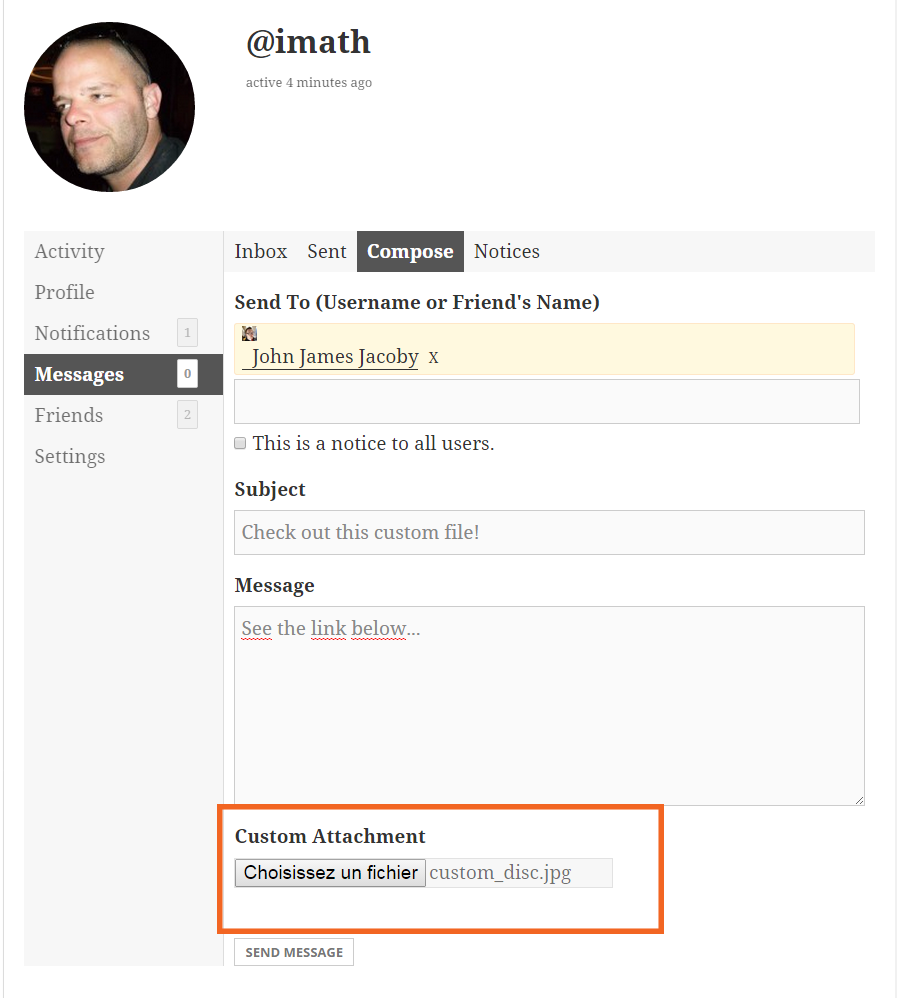
The file input in the messages compose screen
The plugin will add a new file input in the Compose view of private messages component and run some custom validation rules before “attaching” the file to the ID of a private message.
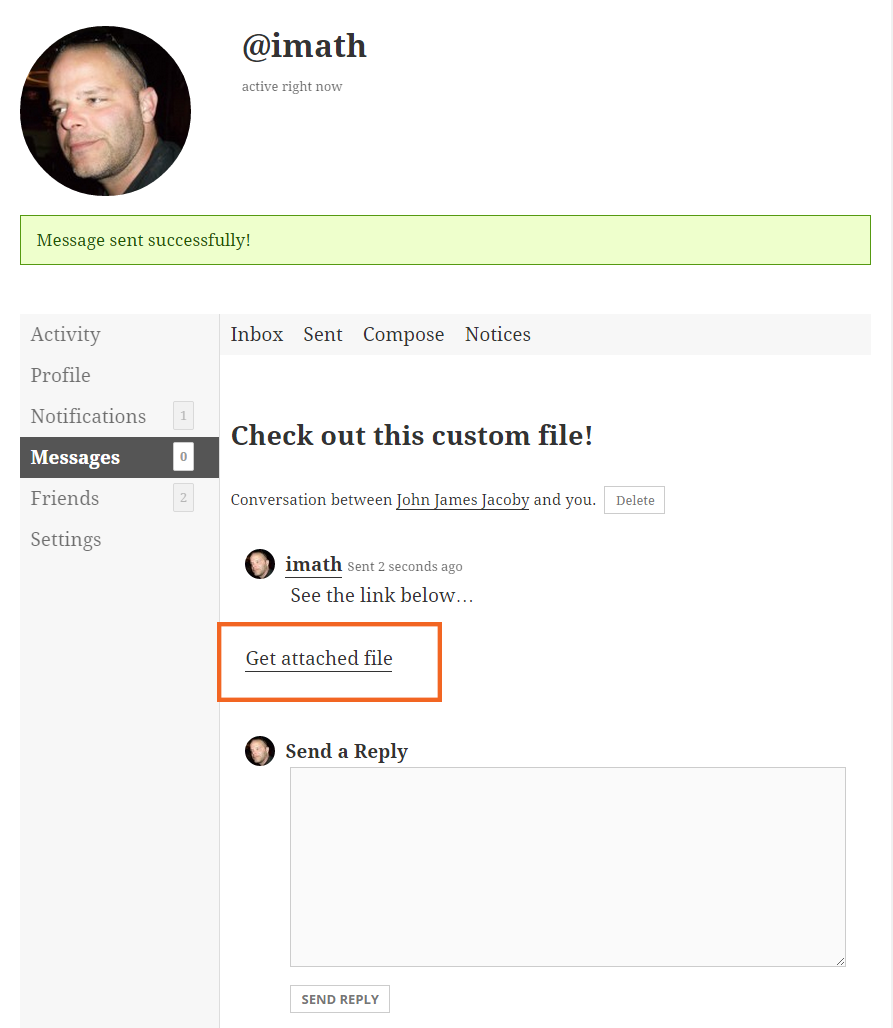
The link to download the file in the messages view screen