Contribute with Code
Thank you for your interest in contributing to BuddyPress! BuddyPress is an open-source project and, as such, is maintained by volunteers just like you. It is vital for the current, and future success of BuddyPress needs to have a healthy group of contributors. You are very welcome to join us to work on making the plugin as great as possible: every enhancement and each improvement depends on the community. This Quick Start Guide to contributing code to BuddyPress Core is where you can find the resources needed to take you through the process of submitting your first patch.
Choose the code editor you feel most comfortable with!
BuddyPress mainly uses four coding languages: PHP, JavaScript, CSS, and HTML. To write into these languages, you need a code/text editor. Here are below some suggestions for nice ones:
- Visual Studio Code (download links),
- Sublime Text (download links),
- Atom (download links),
- Notepad++ (MS Windows only).
- If your a ninja, you can try Vim 😉
Choose the version control system of your preference
BuddyPress uses a Subversion repository to manage the plugin’s code source. This repository is also mirrored on a Git repository. So the version control system you will use is up to you!
If you want to install Subversion, the WordPress “Core Contributor Handbook” has a great tutorial about it.
If you prefer Git and you’ve chosen a different text editor than Visual Studio Code (it is included into it), here are some ways to get it:
- Git (download links),
- Git for Windows (download link)
- Command Line Tools for your Mac (They should be automatically downloaded if you type
gitorsvninto a Terminal window). - If you chose the Atom editor, you could install the Git/GitHub package,
- If you feel more comfortable with GUI software, you can use GitKraken or Sourcetree.
Install some additional tools to fully enjoy BuddyPress contribution
You probably won’t need all the tools listed below when you start contributing to BuddyPress. You can choose only to install NodeJS and install the other tools once you need them.
- NodeJS latest LTS version (download links). Required.
- GruntJS (Installation procedure for the CLI) [1].
- Composer (Installation procedure) [2]. Once installed we advise you to make it globally available under the command name
composer. - WP CLI (Installation procedure) [3]. Once installed we advise you to make it globally available under the command name
wp. - PHPunit (WordPress installation tutorial, Alternative installation tutorial) [4] Once installed we advise you to make it globally available under the command name
phpunit.
[1] GruntJS is used by BuddyPress to run some building tasks like preparing files to be committed, generating RTL versions of CSS stylesheets or minimizing JavaScript files.
[2] Composer is used to install some packages in order to be able to check PHP Code Compatibility and to run PHPUnit tests in our default local development environment.
[3] WP CLI is used to generate a POT file out of the plugin’s PHP and JavaScript files. This POT file is used by translators to translate BuddyPress into various languages (French, German, Spanish, etc..). For your information, WP CLI is a very powerful tool to run WordPress scripts from command lines.
[4] PHPUnit is used to run PHPUnit tests in any local development environment.
Get the BuddyPress development version
First you’ll need a Terminal software, macOs and Linux have been including such a software natively for years. If you’re using Microsoft Windows and chose to work with Git for Windows it includes a BASH emulation to run the same commands we’ll use into this tutorial, otherwise the latest Microsoft Terminal is looking great.
Once you opened a new Terminal window, create a new directory named “buddypress” into the local path of your choice.
mkdir ~/Plugins/buddypress
if you are using Subversion, run this command:
# SVN
svn co https://buddypress.svn.wordpress.org/trunk/ ~/Plugins/buddypress
If you are using Git, use this command instead.
# Git
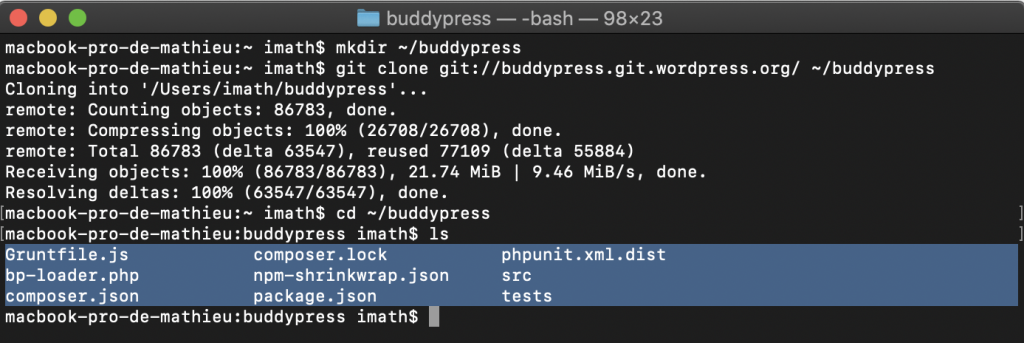
git clone git://buddypress.git.wordpress.org/ ~/Plugins/buddypress
If you move to the ~/Plugins/buddypress directory once the download has finished, you should find the highlighted folders and files of the following screen capture.
Install our default local development environment
The BuddyPress development version you just downloaded contains the @wordpress/env package to generate a local environment using NodeJS (latest LTS version) and Docker. To install Docker, please follow the instructions listed below according to your operating system:
Once Docker is installed and is running in the background, open a Terminal window to setup your local development environment.
cd ~/Plugins/buddypress
From the ~/Plugins/buddypress the folder where you downloaded the code, you’ll first need to install the node modules we are using in BuddyPress. To do so simply run the following command and take a well-deserved break to let NodeJS download the modules we use as development dependencies (it might take some time!) :
npm install
For starters, if you face any error during npm install at the Microsoft windows env, you will also have to install windows-build-tools.
Once node modules are installed, if you plan to run/write PHP unit tests, you’ll also need to install some composer packages:
composer install
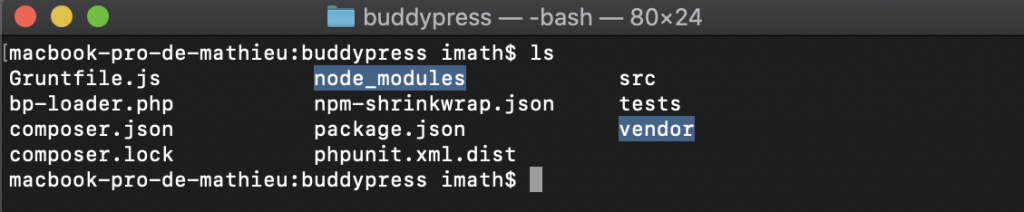
You should see that your ~/Plugins/buddypress directory now contains 1 or 2 more sub directories: /node_modules and /vendor if you installed the composer packages.
Now we can setup the local development environment using this command:
npm run wp-env start
The first time you’ll execute this command it will take some time to run and you’ll see that 2 downloads will start:
- Core: it’s the WordPress development version.
- BP REST: it’s the plugin we use to develop the BP REST API.
Wait until the Terminal displays the following message:
✔︎ WordPress started. (in 00s 00ms)
Then, you can open your Internet Browser and go to this URL: http://localhost:8888/wp-admin/.
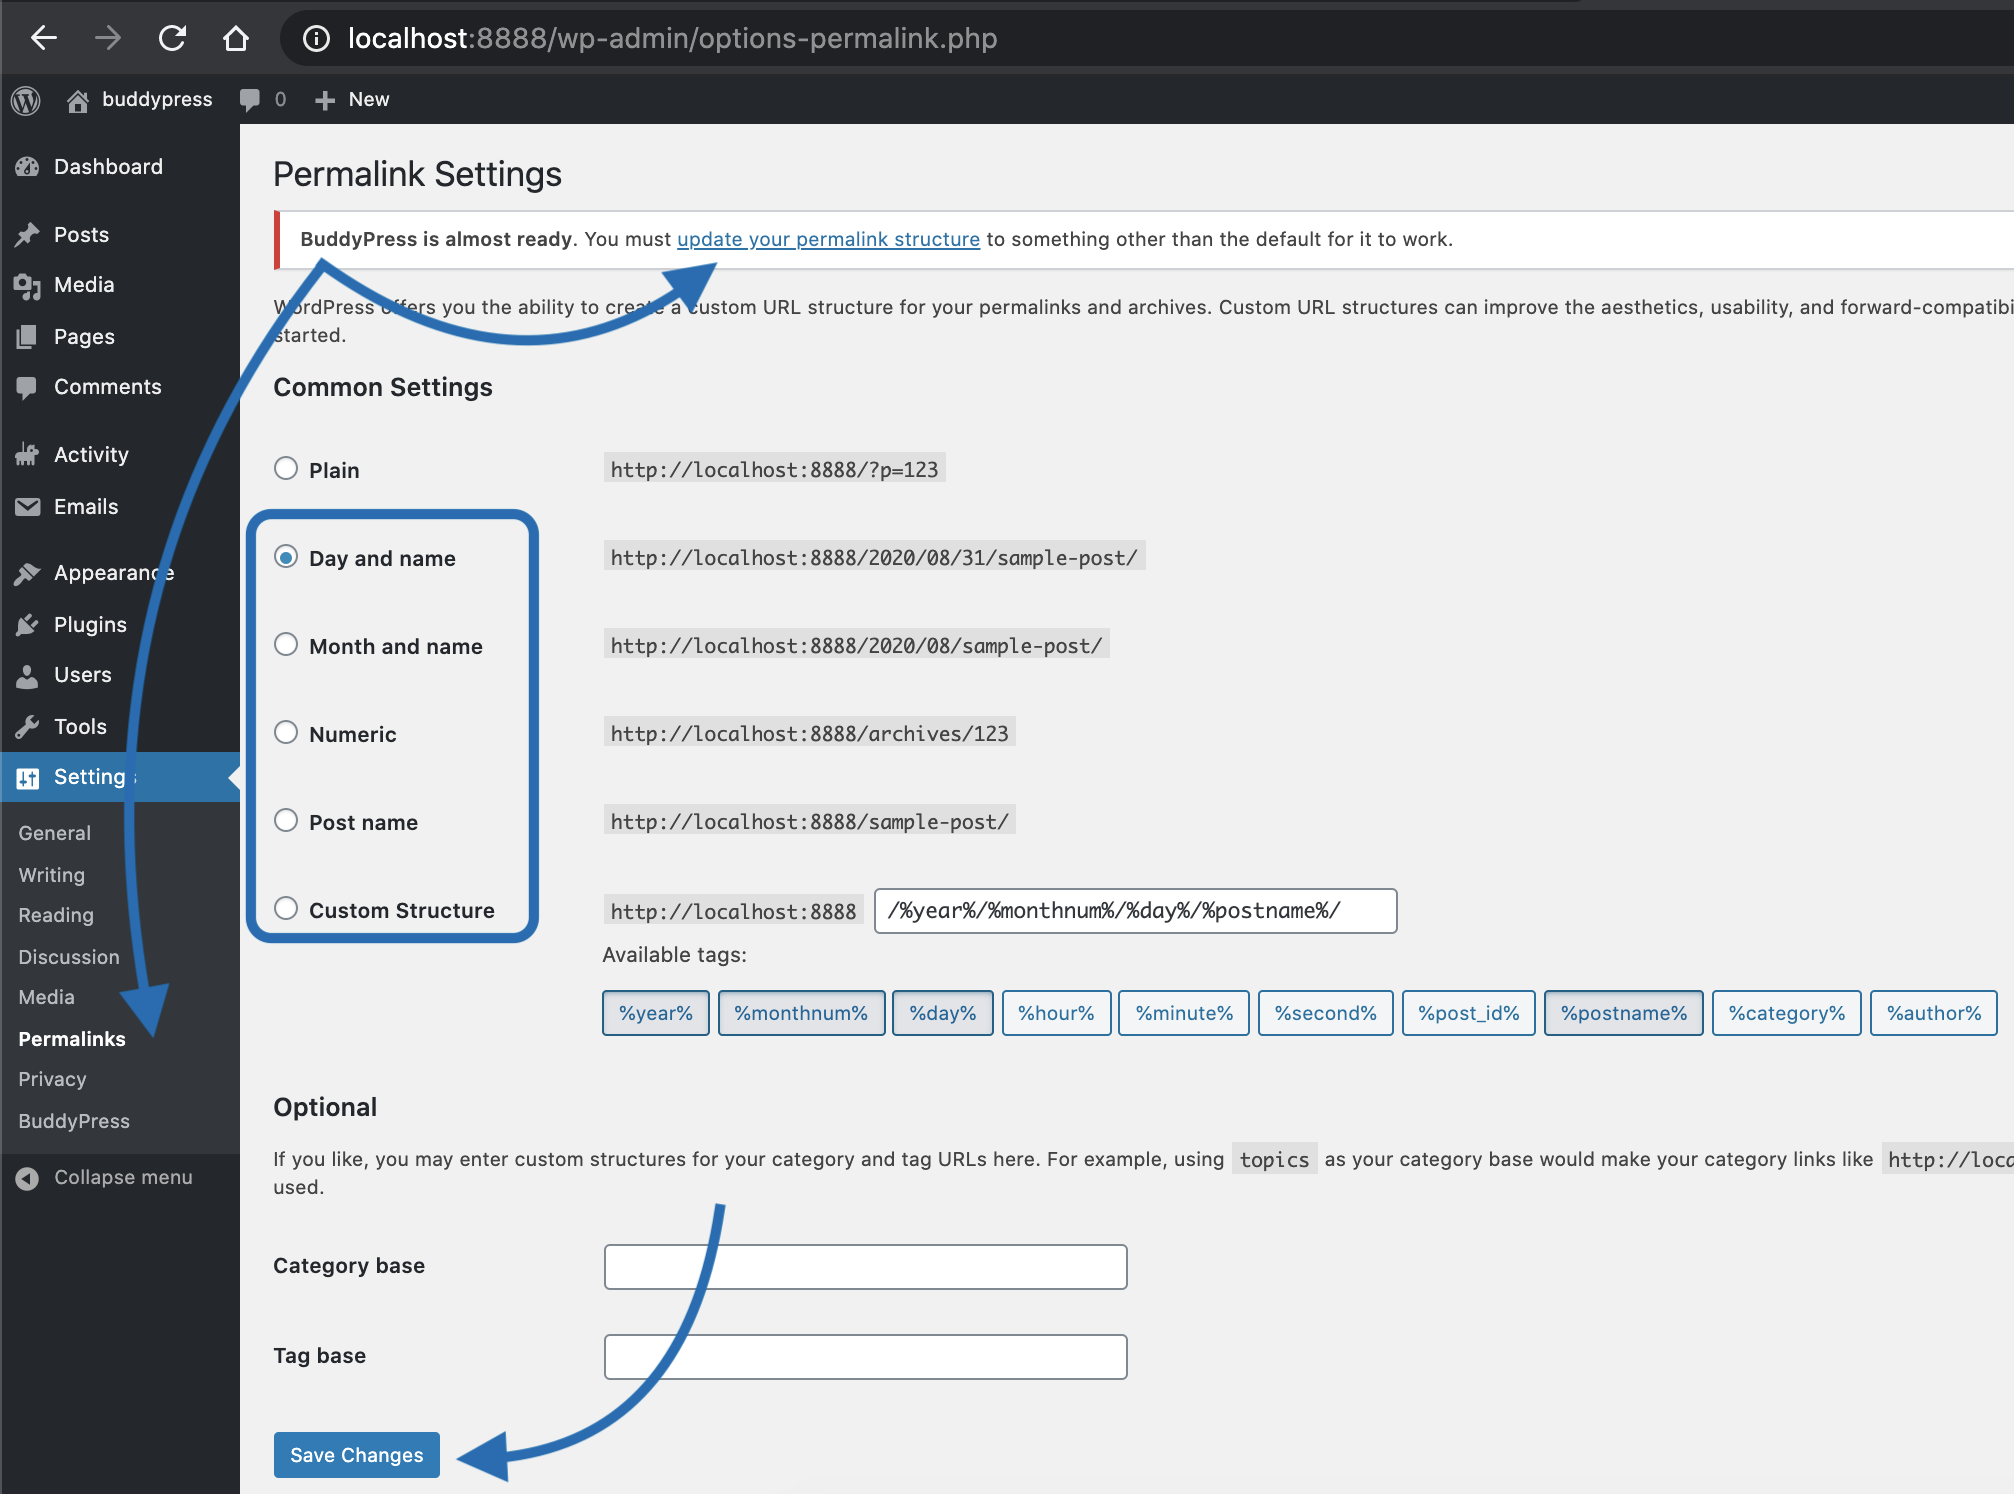
You’ll have a last step to achieve: setting the permalink structure to something else than the plain option. Here are the default credentials for the Administrator account:
- Username:
admin - Password:
password
Other useful commands
Stopping the development environment
npm run wp-env stop
Once you run this command, you will quickly get the following confirmation message.
✔︎ Stopped WordPress. (in 00s 00ms)
Running PHP unit tests
If you chose to install Composer and the packages we use as development dependencies, you will be able to run our PHP unit tests suite (and of course contribute to it adding new tests).
On a regular WordPress configuration
npm run test-php
On a Multisite WordPress configuration
npm run test-php-multisite
Customizing your BuddyPress local development environment
To develop BuddyPress we use the development version of WordPress, the development version of the BP REST API and we set two debugging constants:
define( 'WP_DEBUG', true );
define( 'SCRIPT_DEBUG', true );
These options are defined into the .wp-env.json file of the BuddyPress repository. You can override these options using a file named .wp-env.override.json into your ~/Plugins/buddypress local directory.
For instance, you could choose to include another plugin like the one we use to develop BP Blocks using this content for the overriding file:
{
	"core": "WordPress/WordPress#master",
	"plugins": [ ".", "buddypress/BP-REST#master", "buddypress/bp-blocks#master" ],
	"config": {
		"WP_DEBUG": true,
		"SCRIPT_DEBUG": true
	}
}
Setting up a different development environment
Our goal with our local development environment is to try to make it easier & faster for new contributors to be ready to help the BuddyPress project. If you prefer to build your very own local environment: it’s totally fine! In this case, to contribute to BuddyPress, you’ll simply need to checkout our SVN repository or clone our Git mirror into the /wp-content/plugins directory of the WordPress you use into your local environment.
For your information, the WordPress core contributor handbook includes great tutorials to build such an environment.
Patching BuddyPress
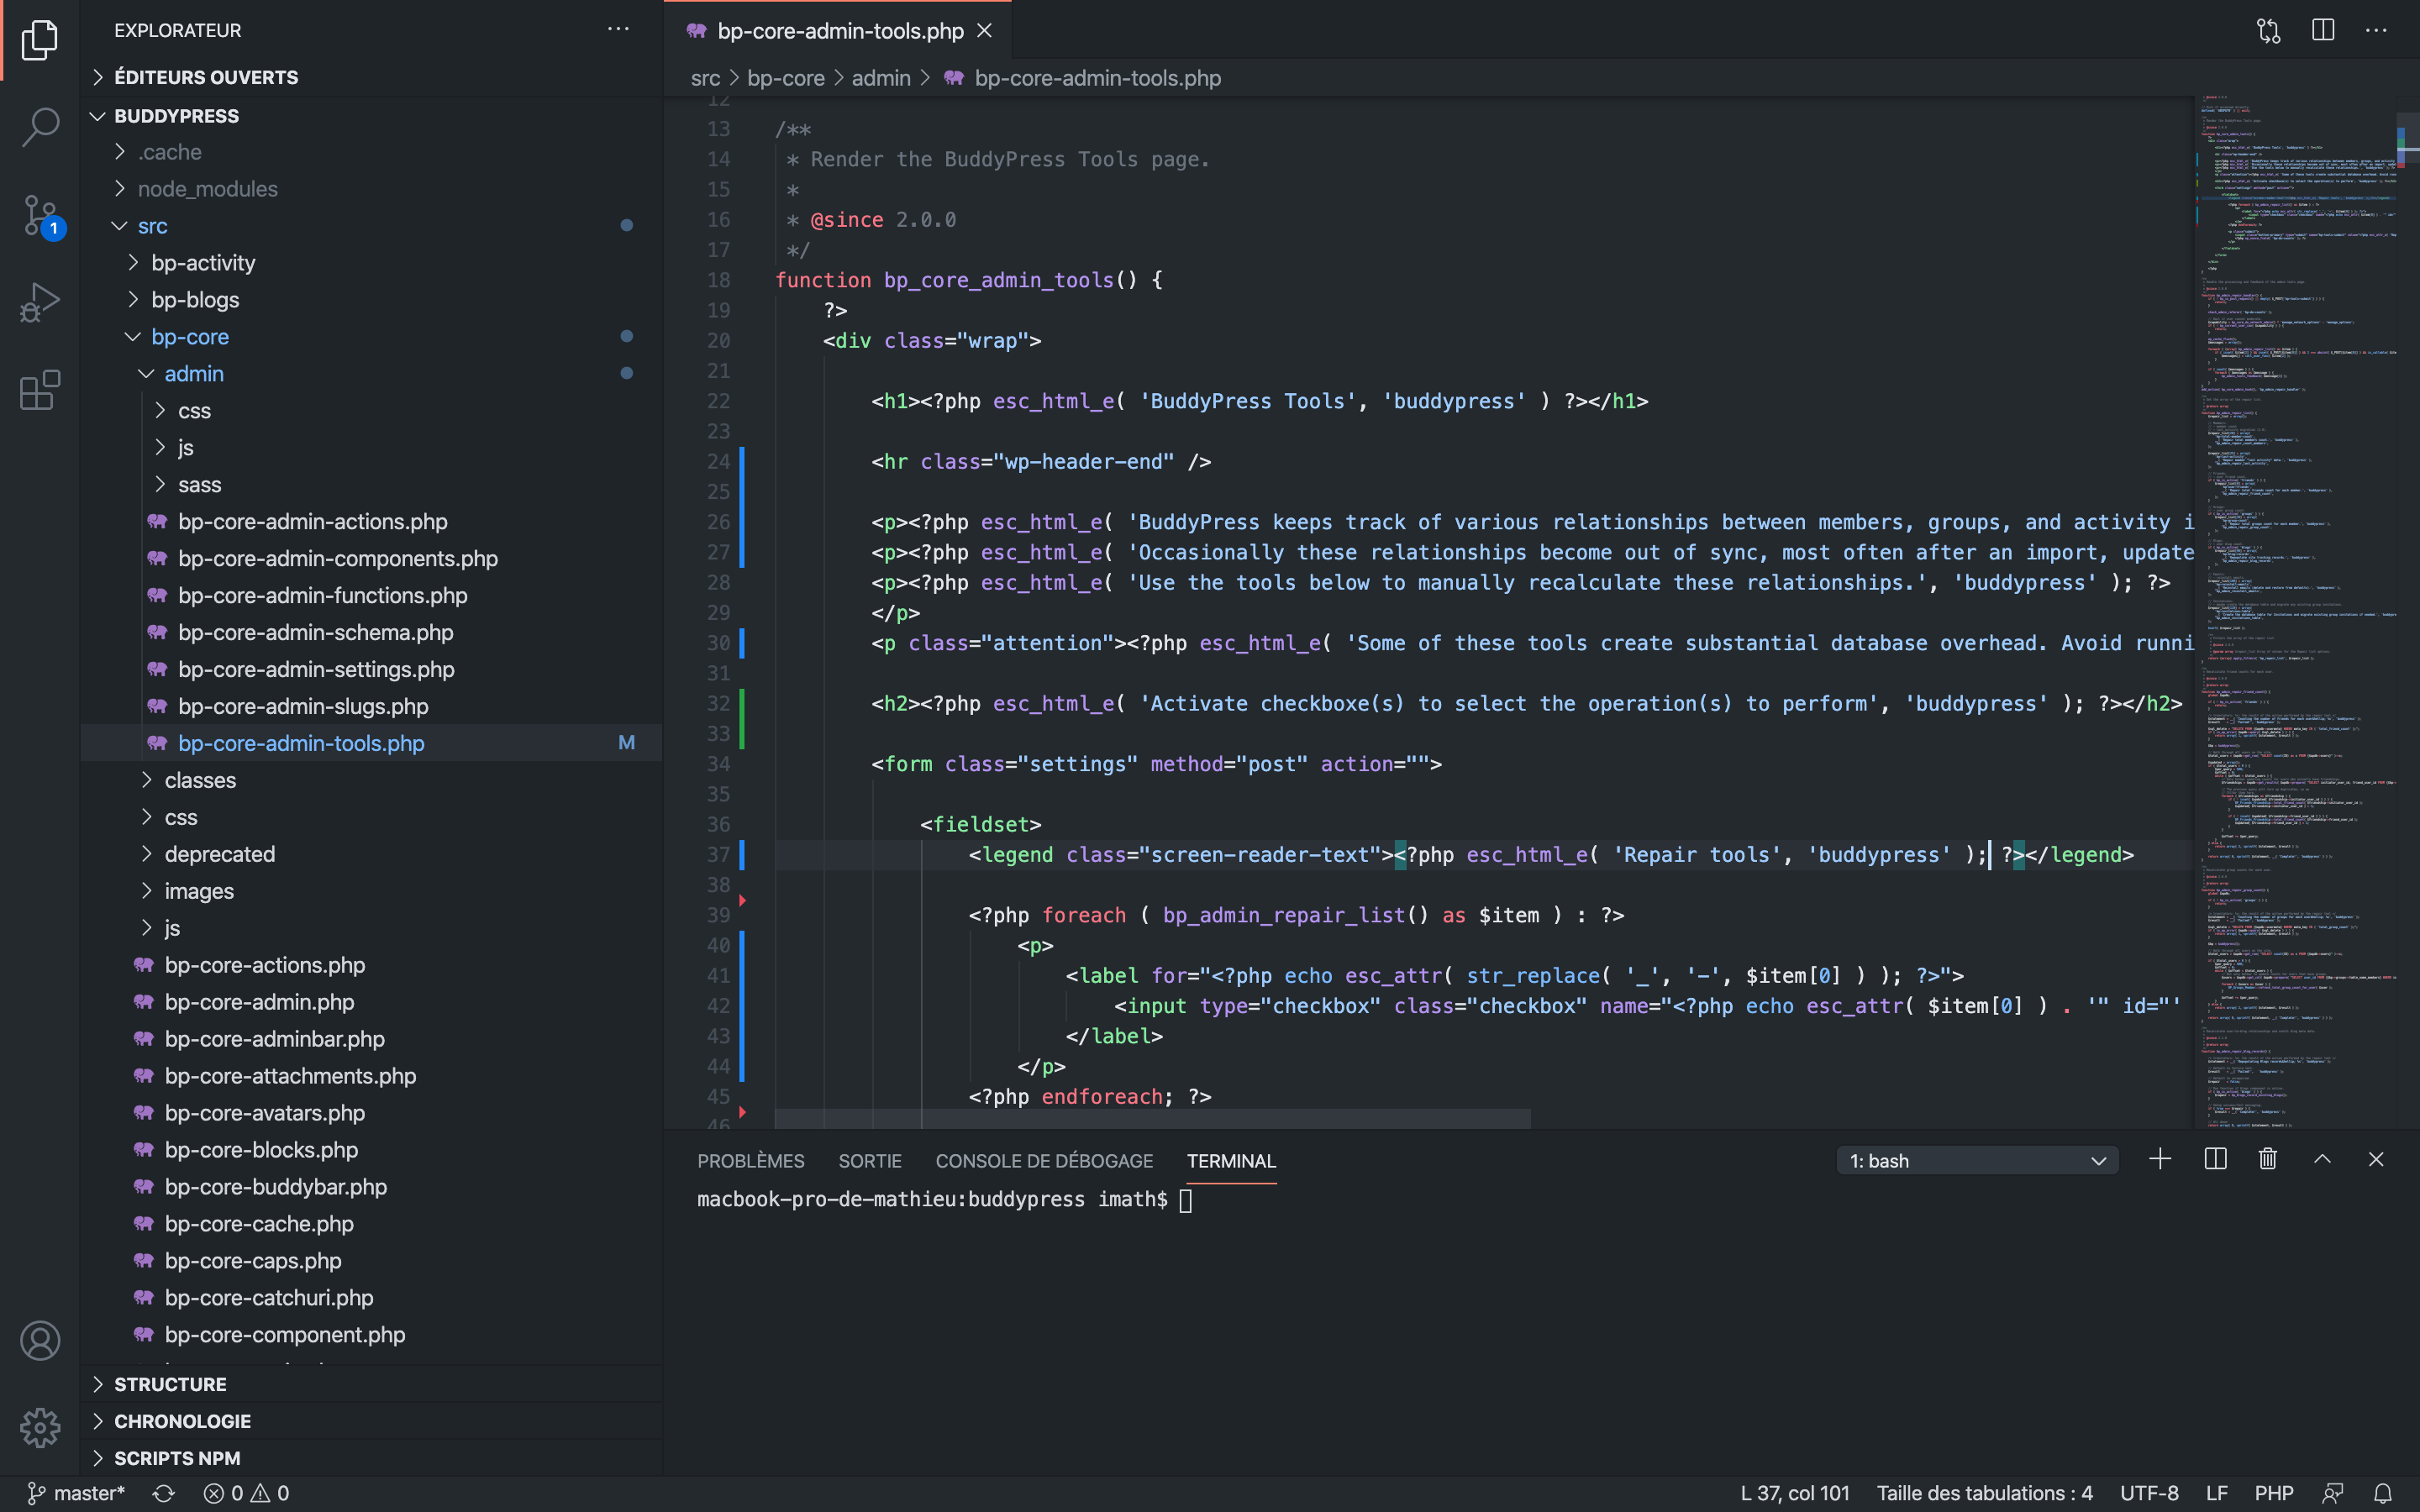
Let’s work with a real bug example (It might has been fixed when you’ll read this page!) to understand how to suggest a fix to the BuddyPress development team. First, open the ~/Plugins/buddypress directory into your favorite code editor.

As you can see, I’m using the Visual Studio Code editor 🙂 I like to have a tree of all directories and files on the left and a Terminal window under the opened file’s content.
The first big differences you will find with the way the BuddyPress plugin is organized into the WordPress Plugins directory are:
- The plugin’s code is inside a
srcdirectory: that’s your main target as a new BuddyPress contributor. - There’s a
jsdirectory at the same level than the plugin’s component directories - The plugin’s PHP unit tests suite is inside the
testsdirectory - There’s a bunch of configuration files like
package.jsonorcomposer.json
Before doing any changes, I advise you to always synchronize your local copy of the BuddyPress development version with our central repository. Using your Terminal, simply run the command corresponding to the version control system you chose.
# SVN
svn up

# Git
git pull origin master
Once synchronized, let’s launch the BuddyPress local development environment.
npm run wp-env start
Once you get the confirmation it’s up and running, you can go to http://localhost:8888 to play with the WordPress site.

Finding an issue
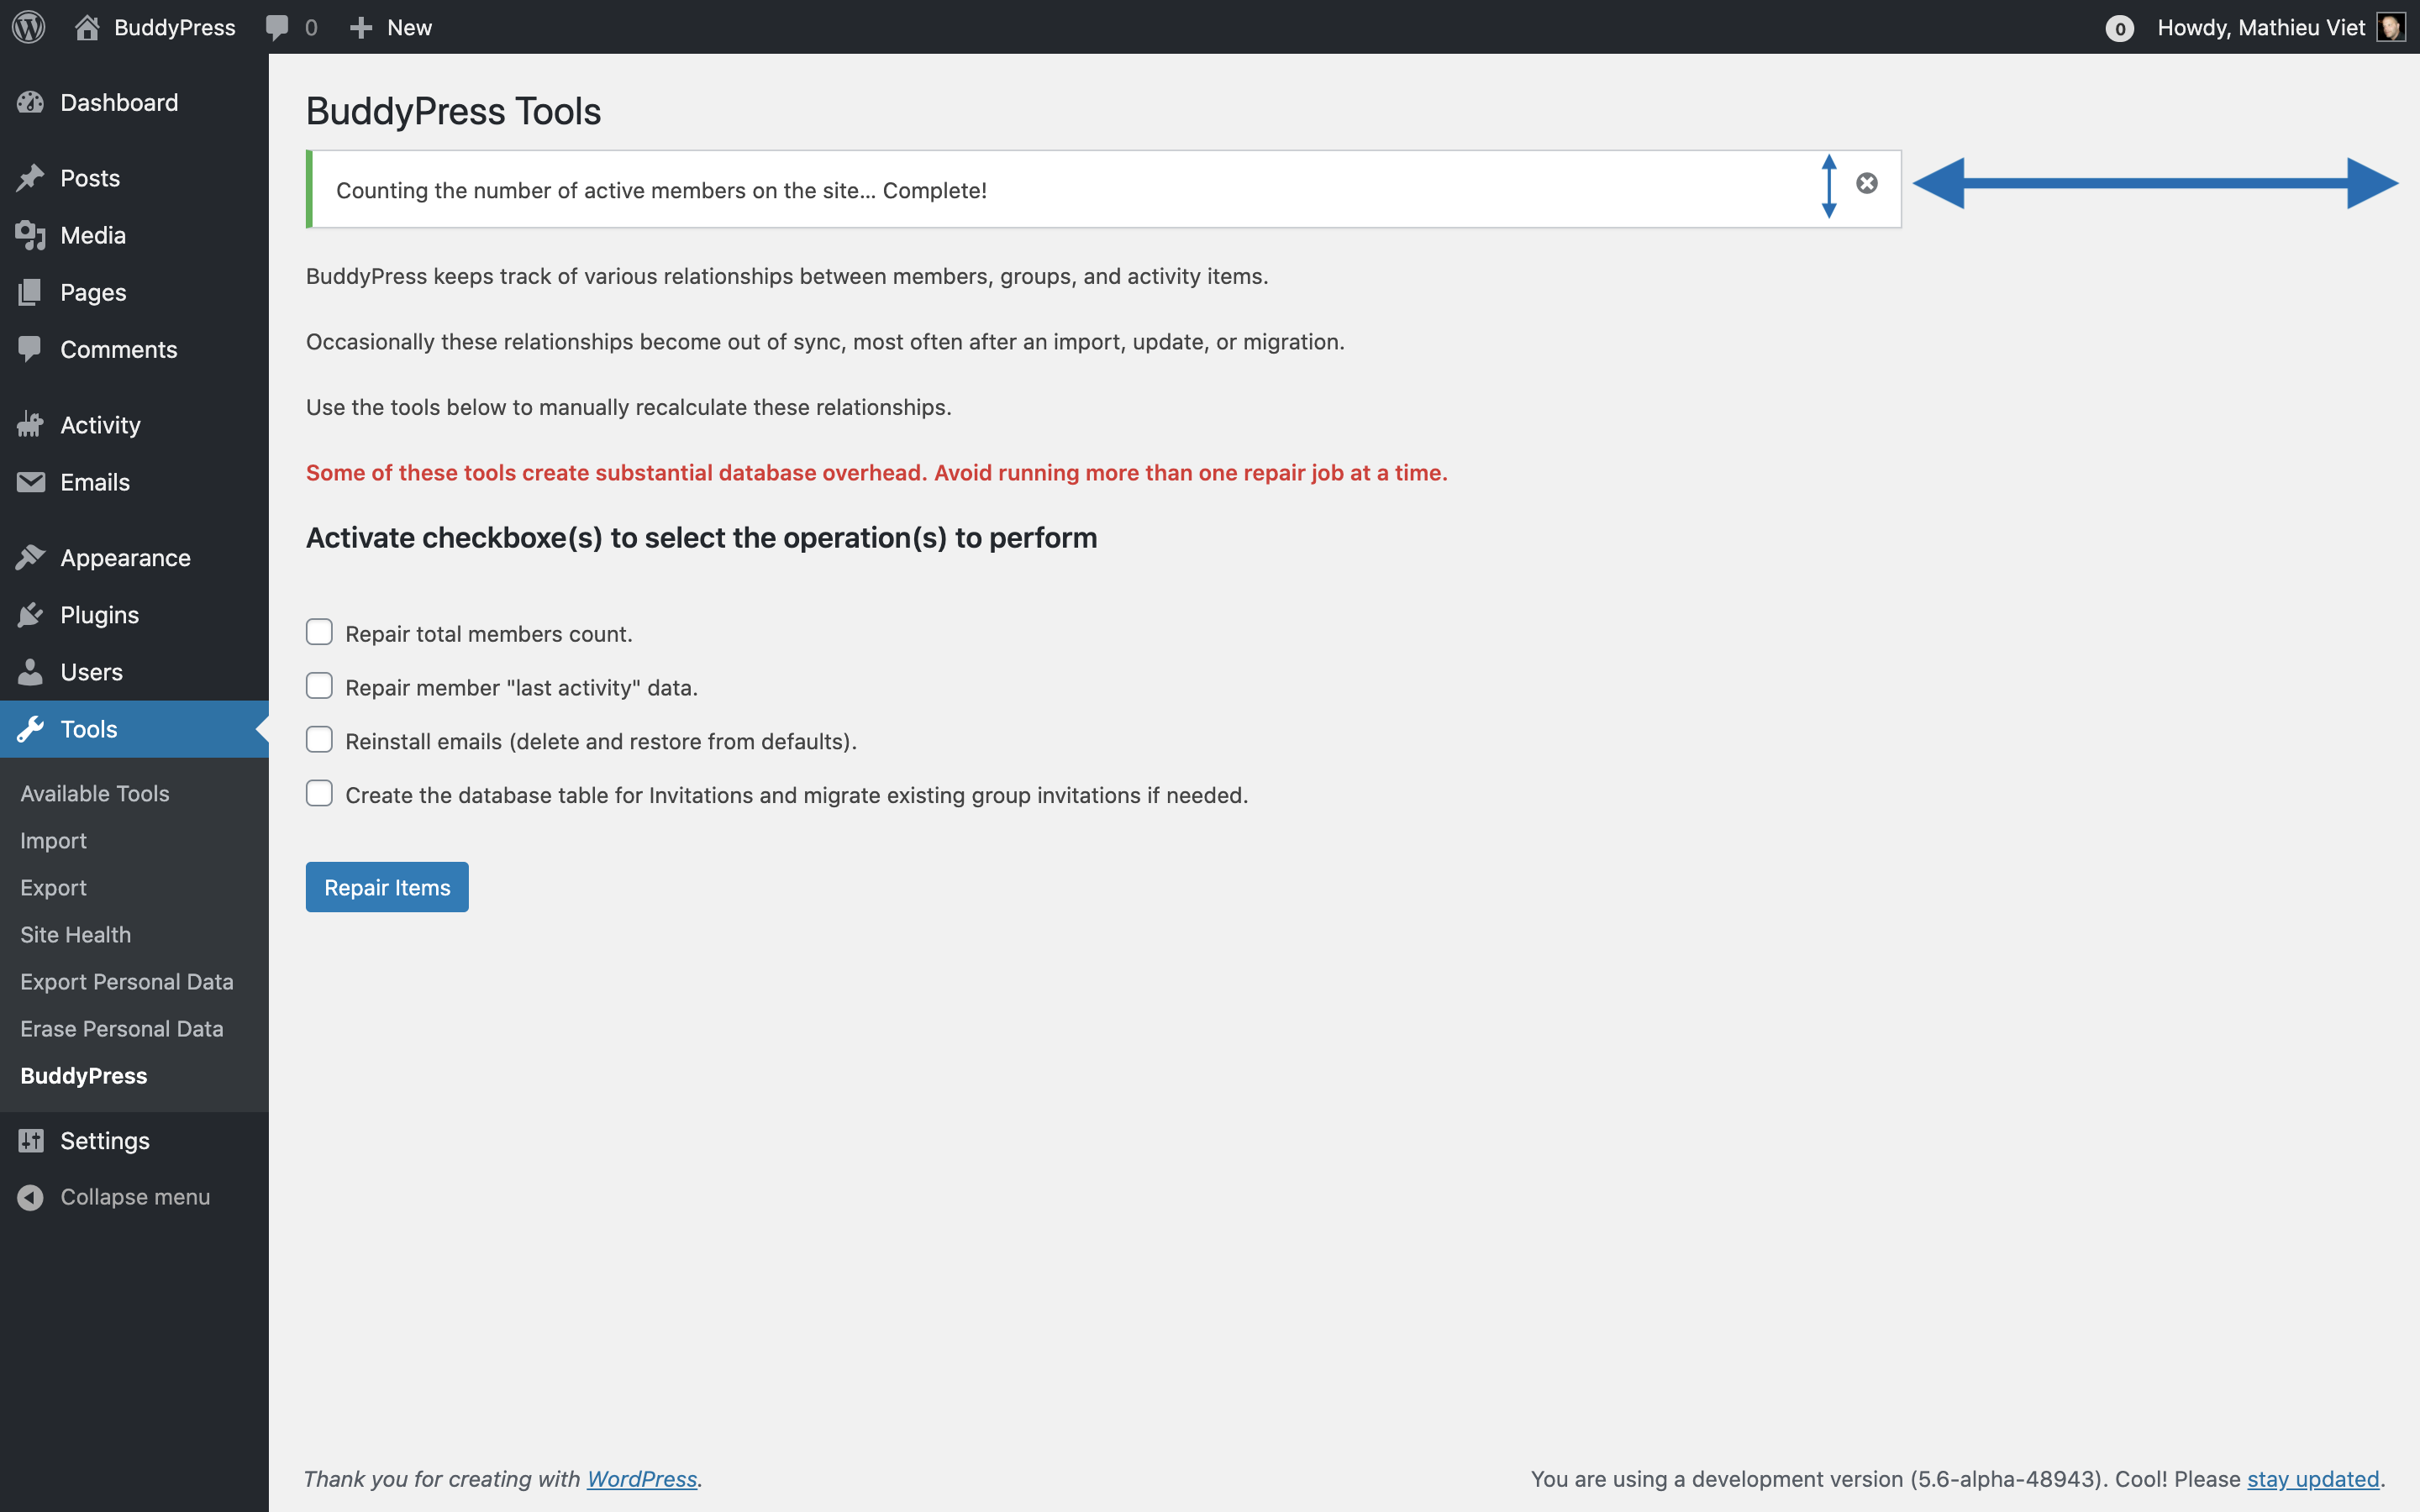
If you log in and go to the Dashboard then open the BuddyPress’ tools submenu, here’s what you get.
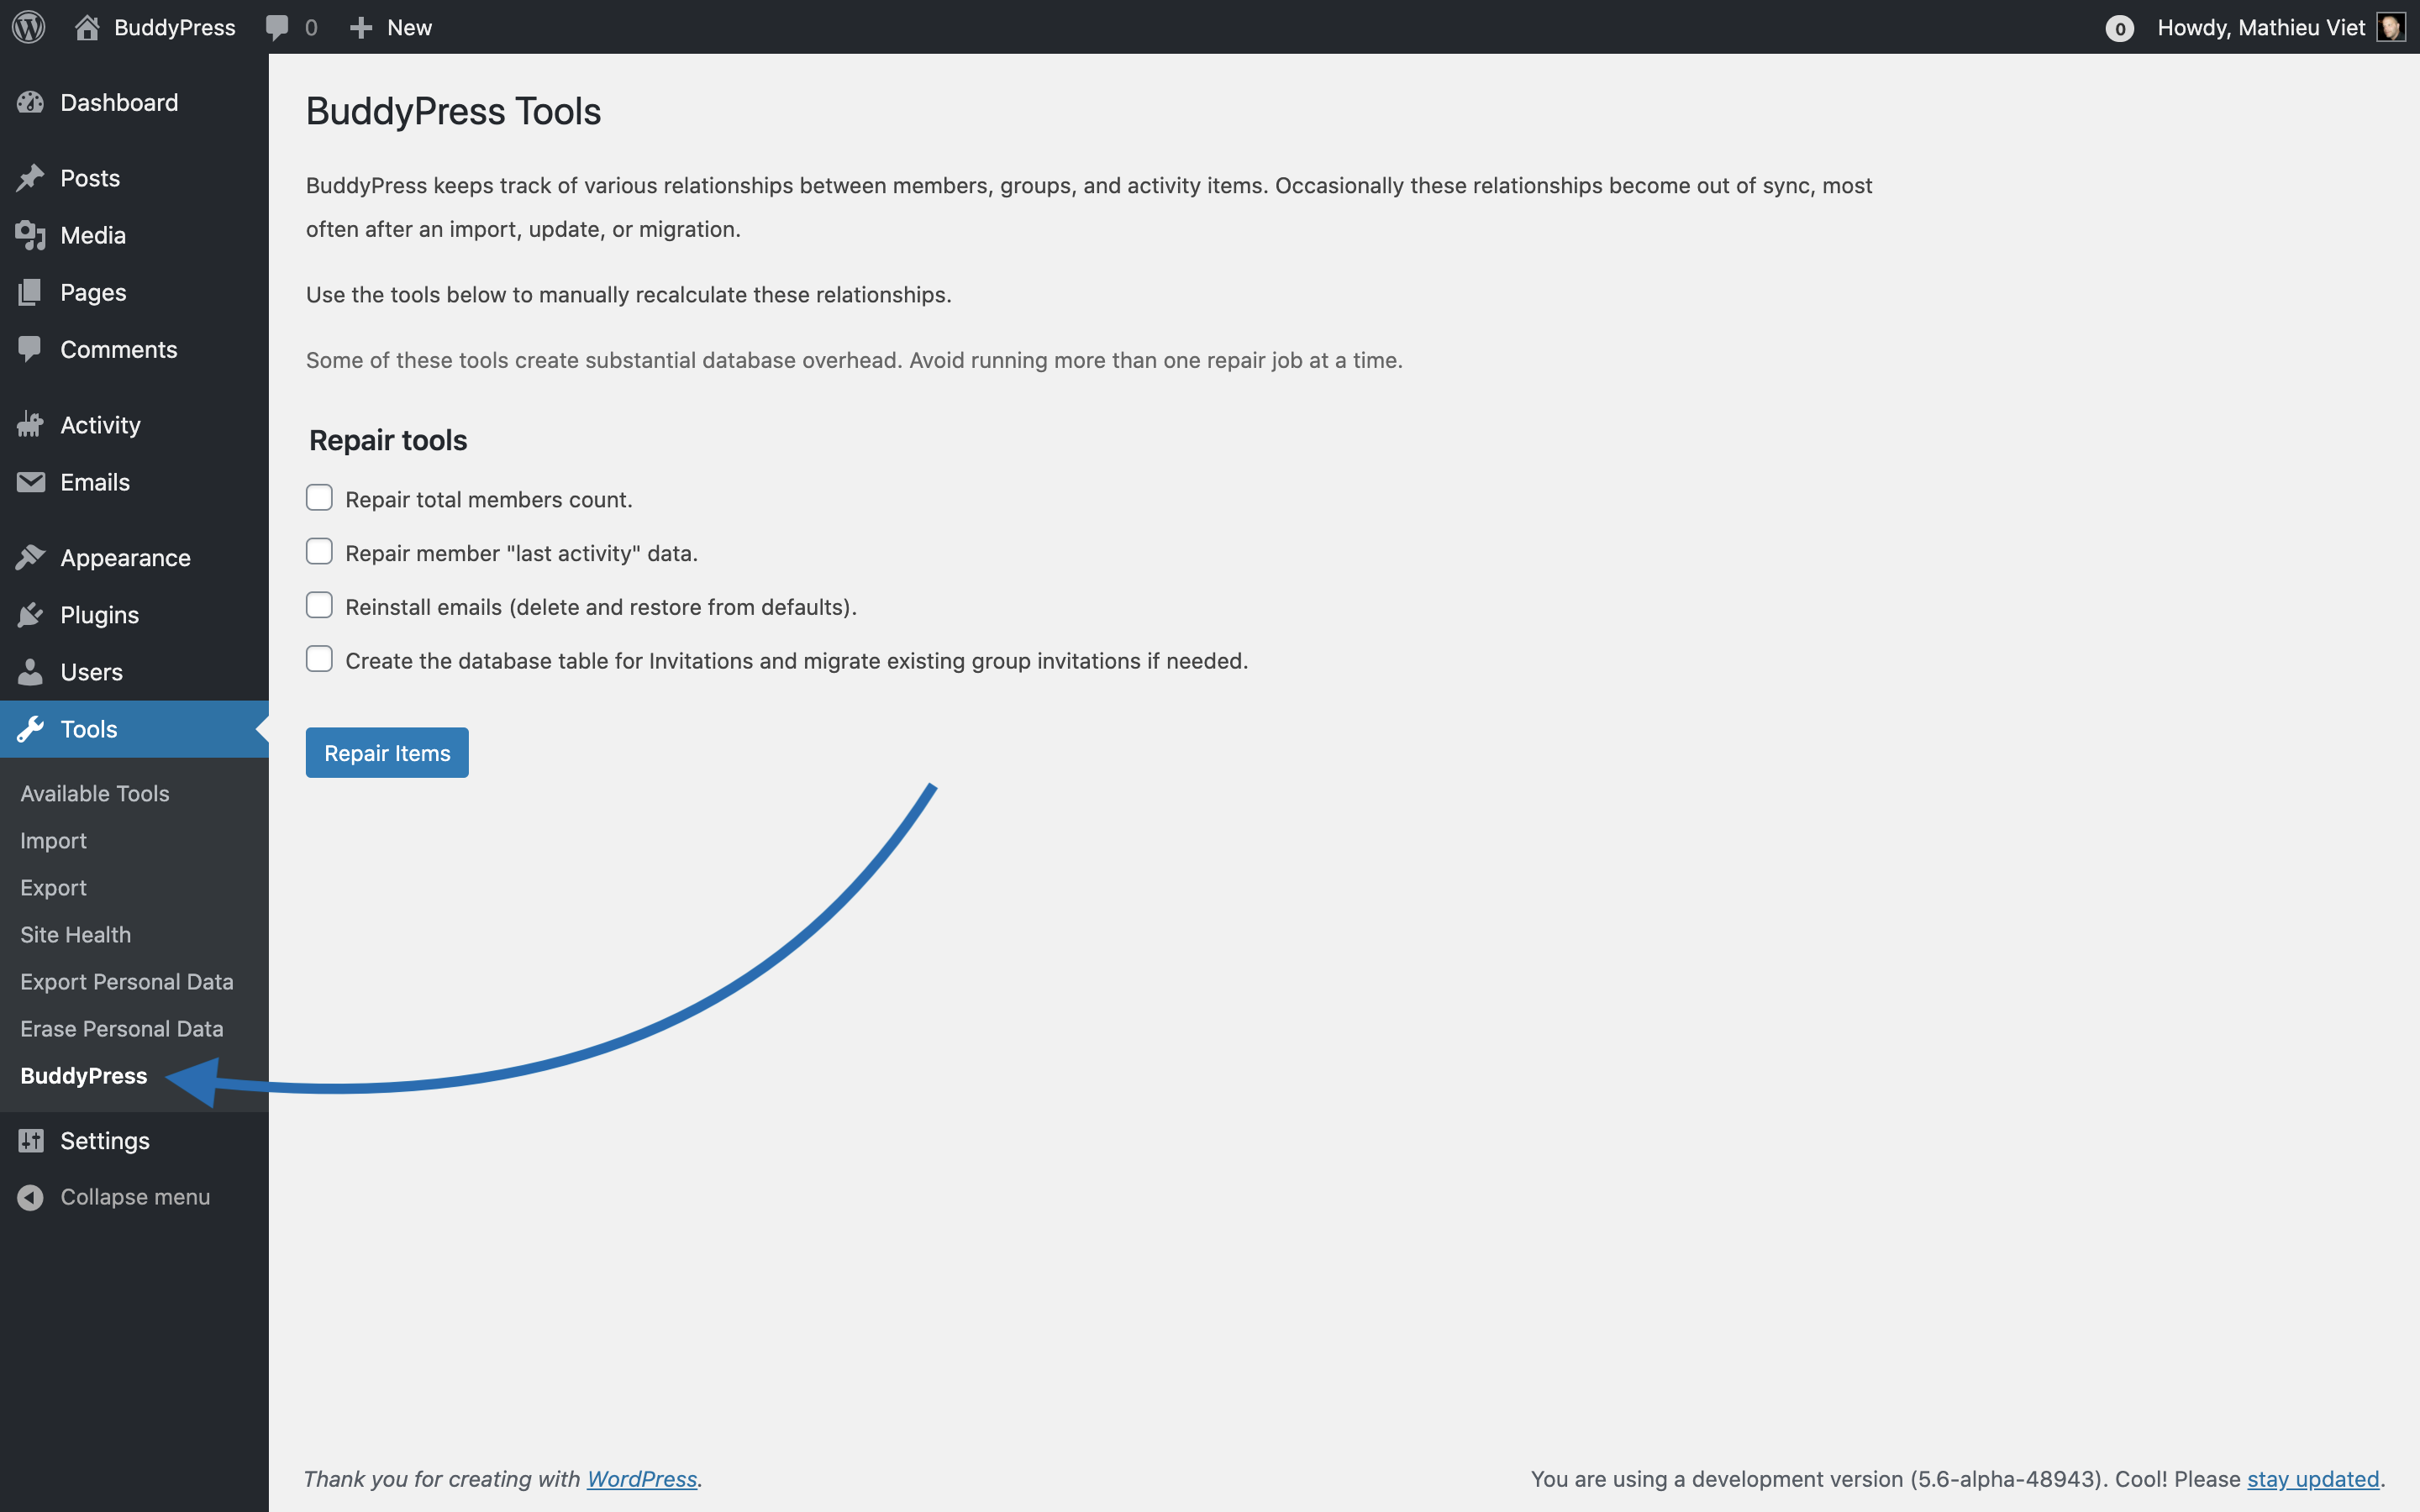
Nothing special so far, but let’s activate one of the checkboxes, hit the “Repair items” button and have eyes on the notice that will then be displayed.
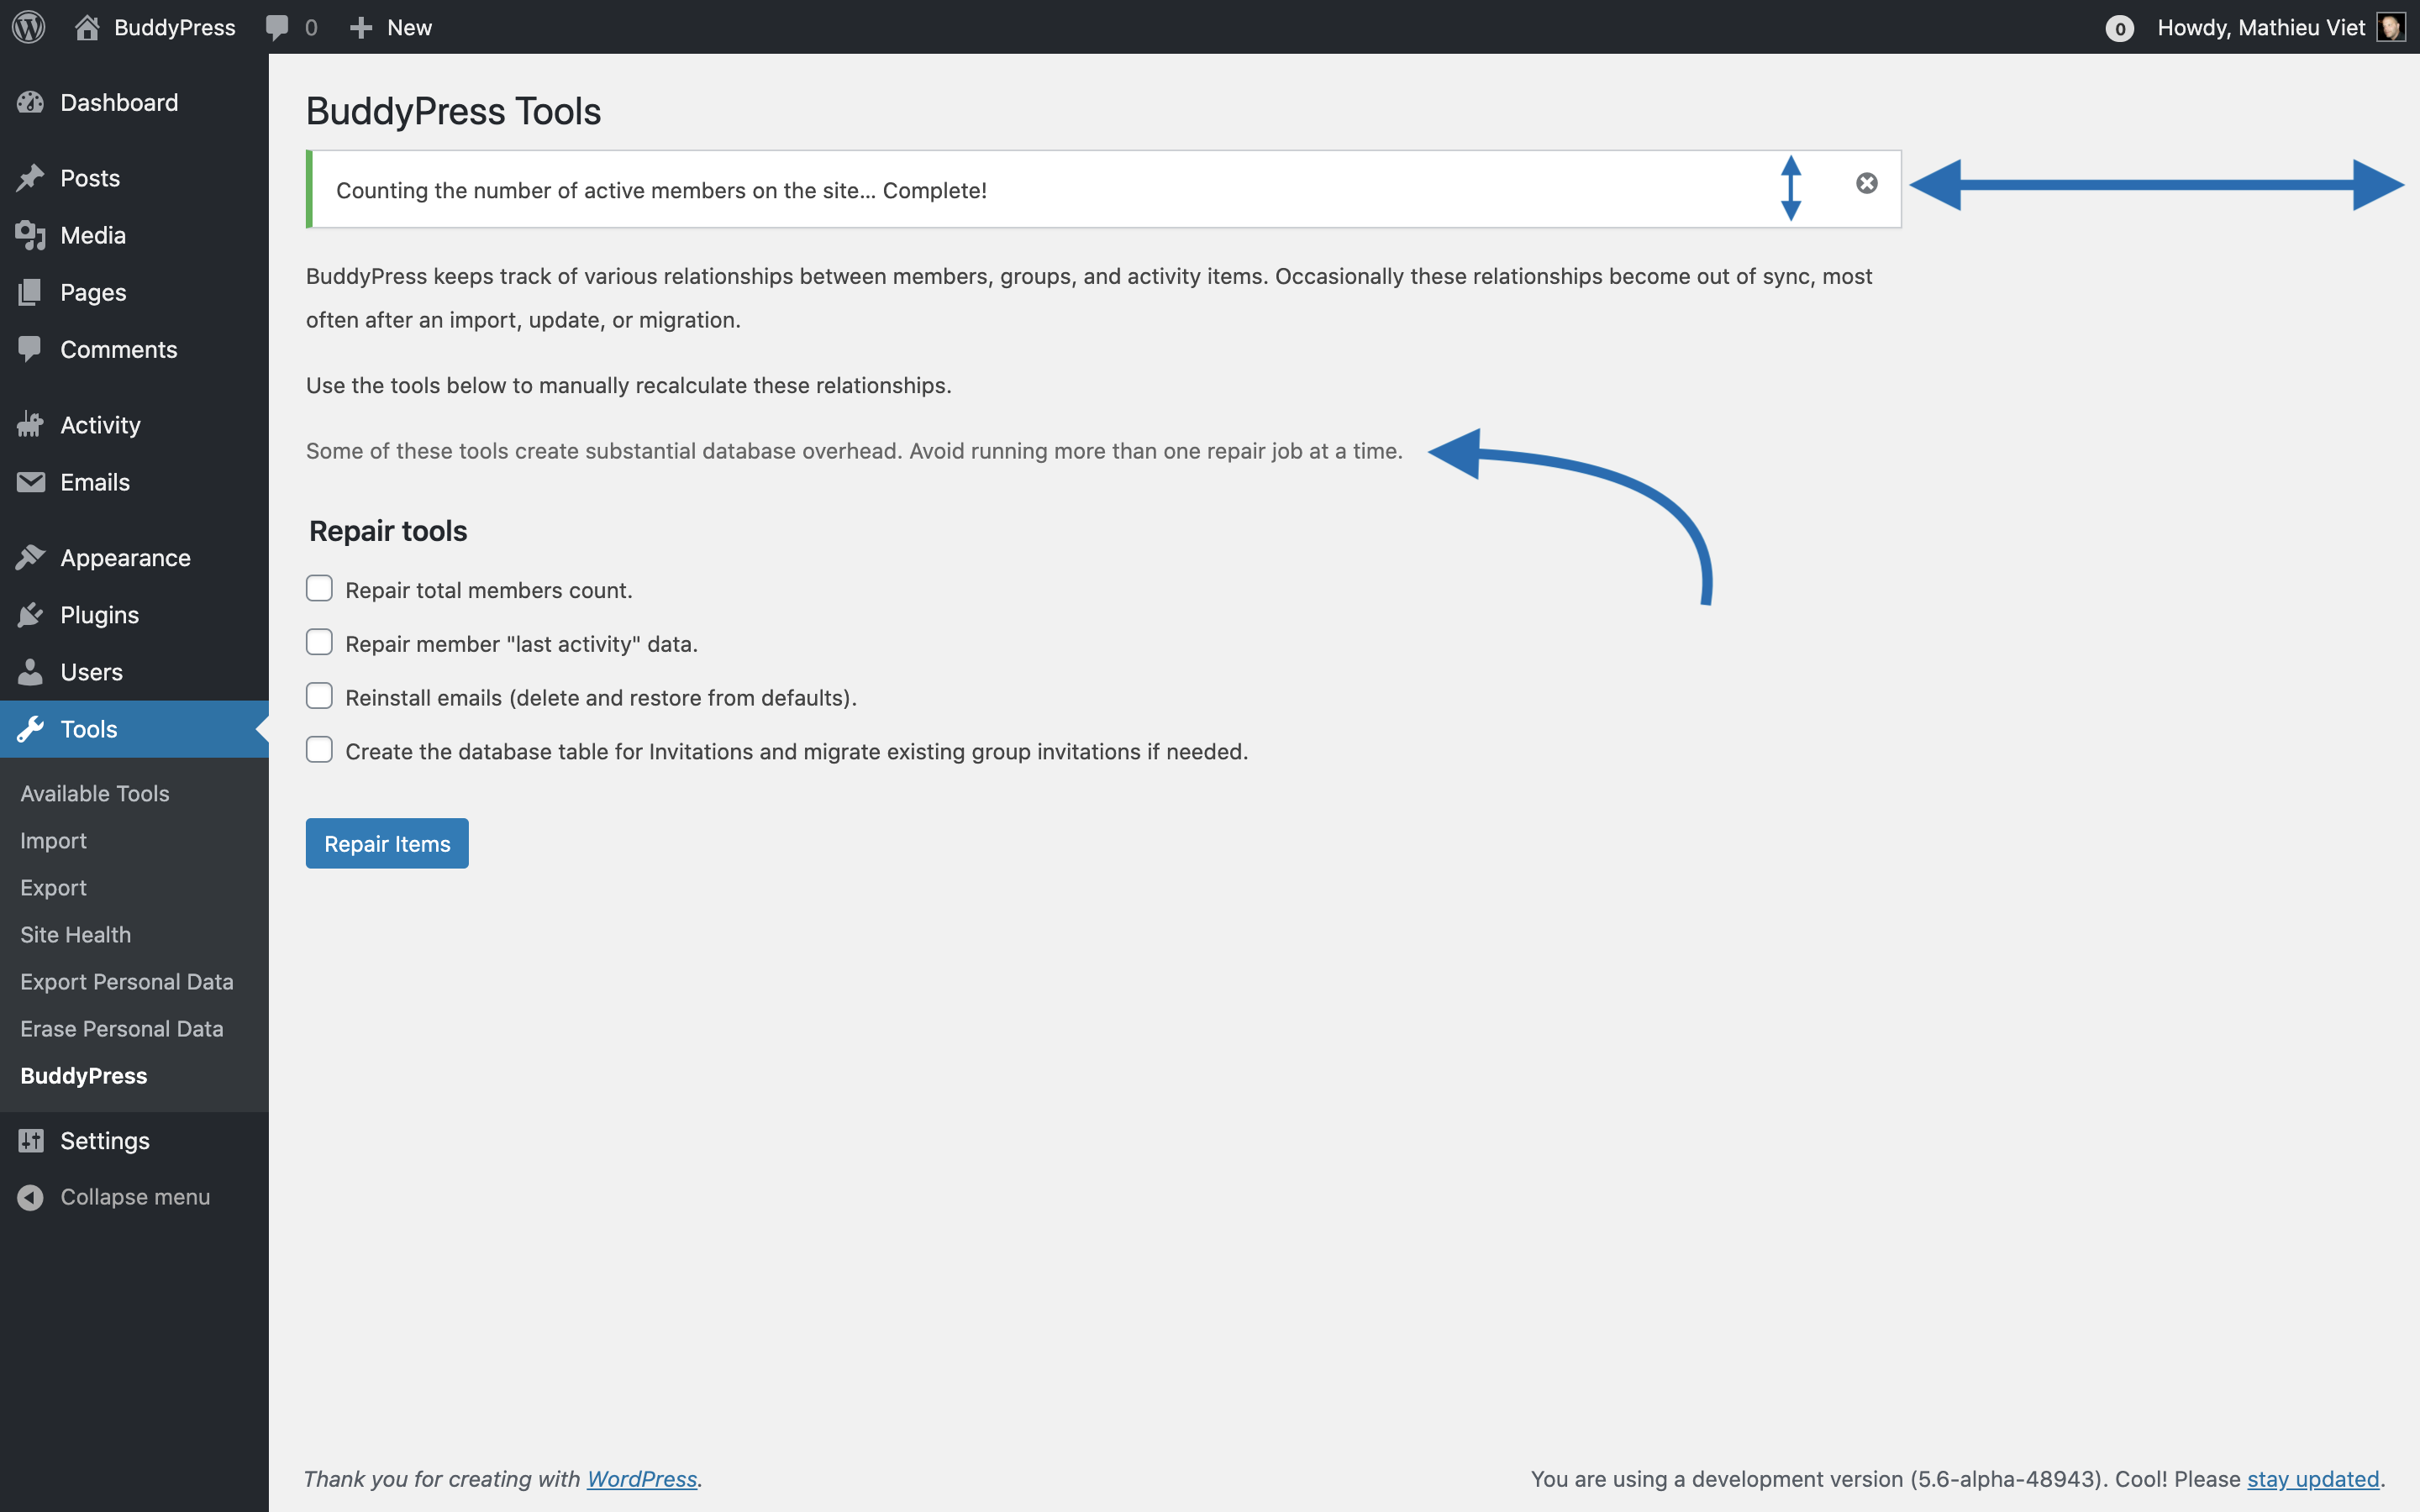
Then, you should see some lack of consistency with the WordPress administration general appearance:
- The notice message does not used the width you could find in other administration screens.
- This notice message also has a bigger height, giving the impression the dismissible button (x) is not vertically aligned.
Moreover, it’s minor but, the color of the information above the “Repair tools” form (which seems to be an important advice) is lighter than the rest of the text.
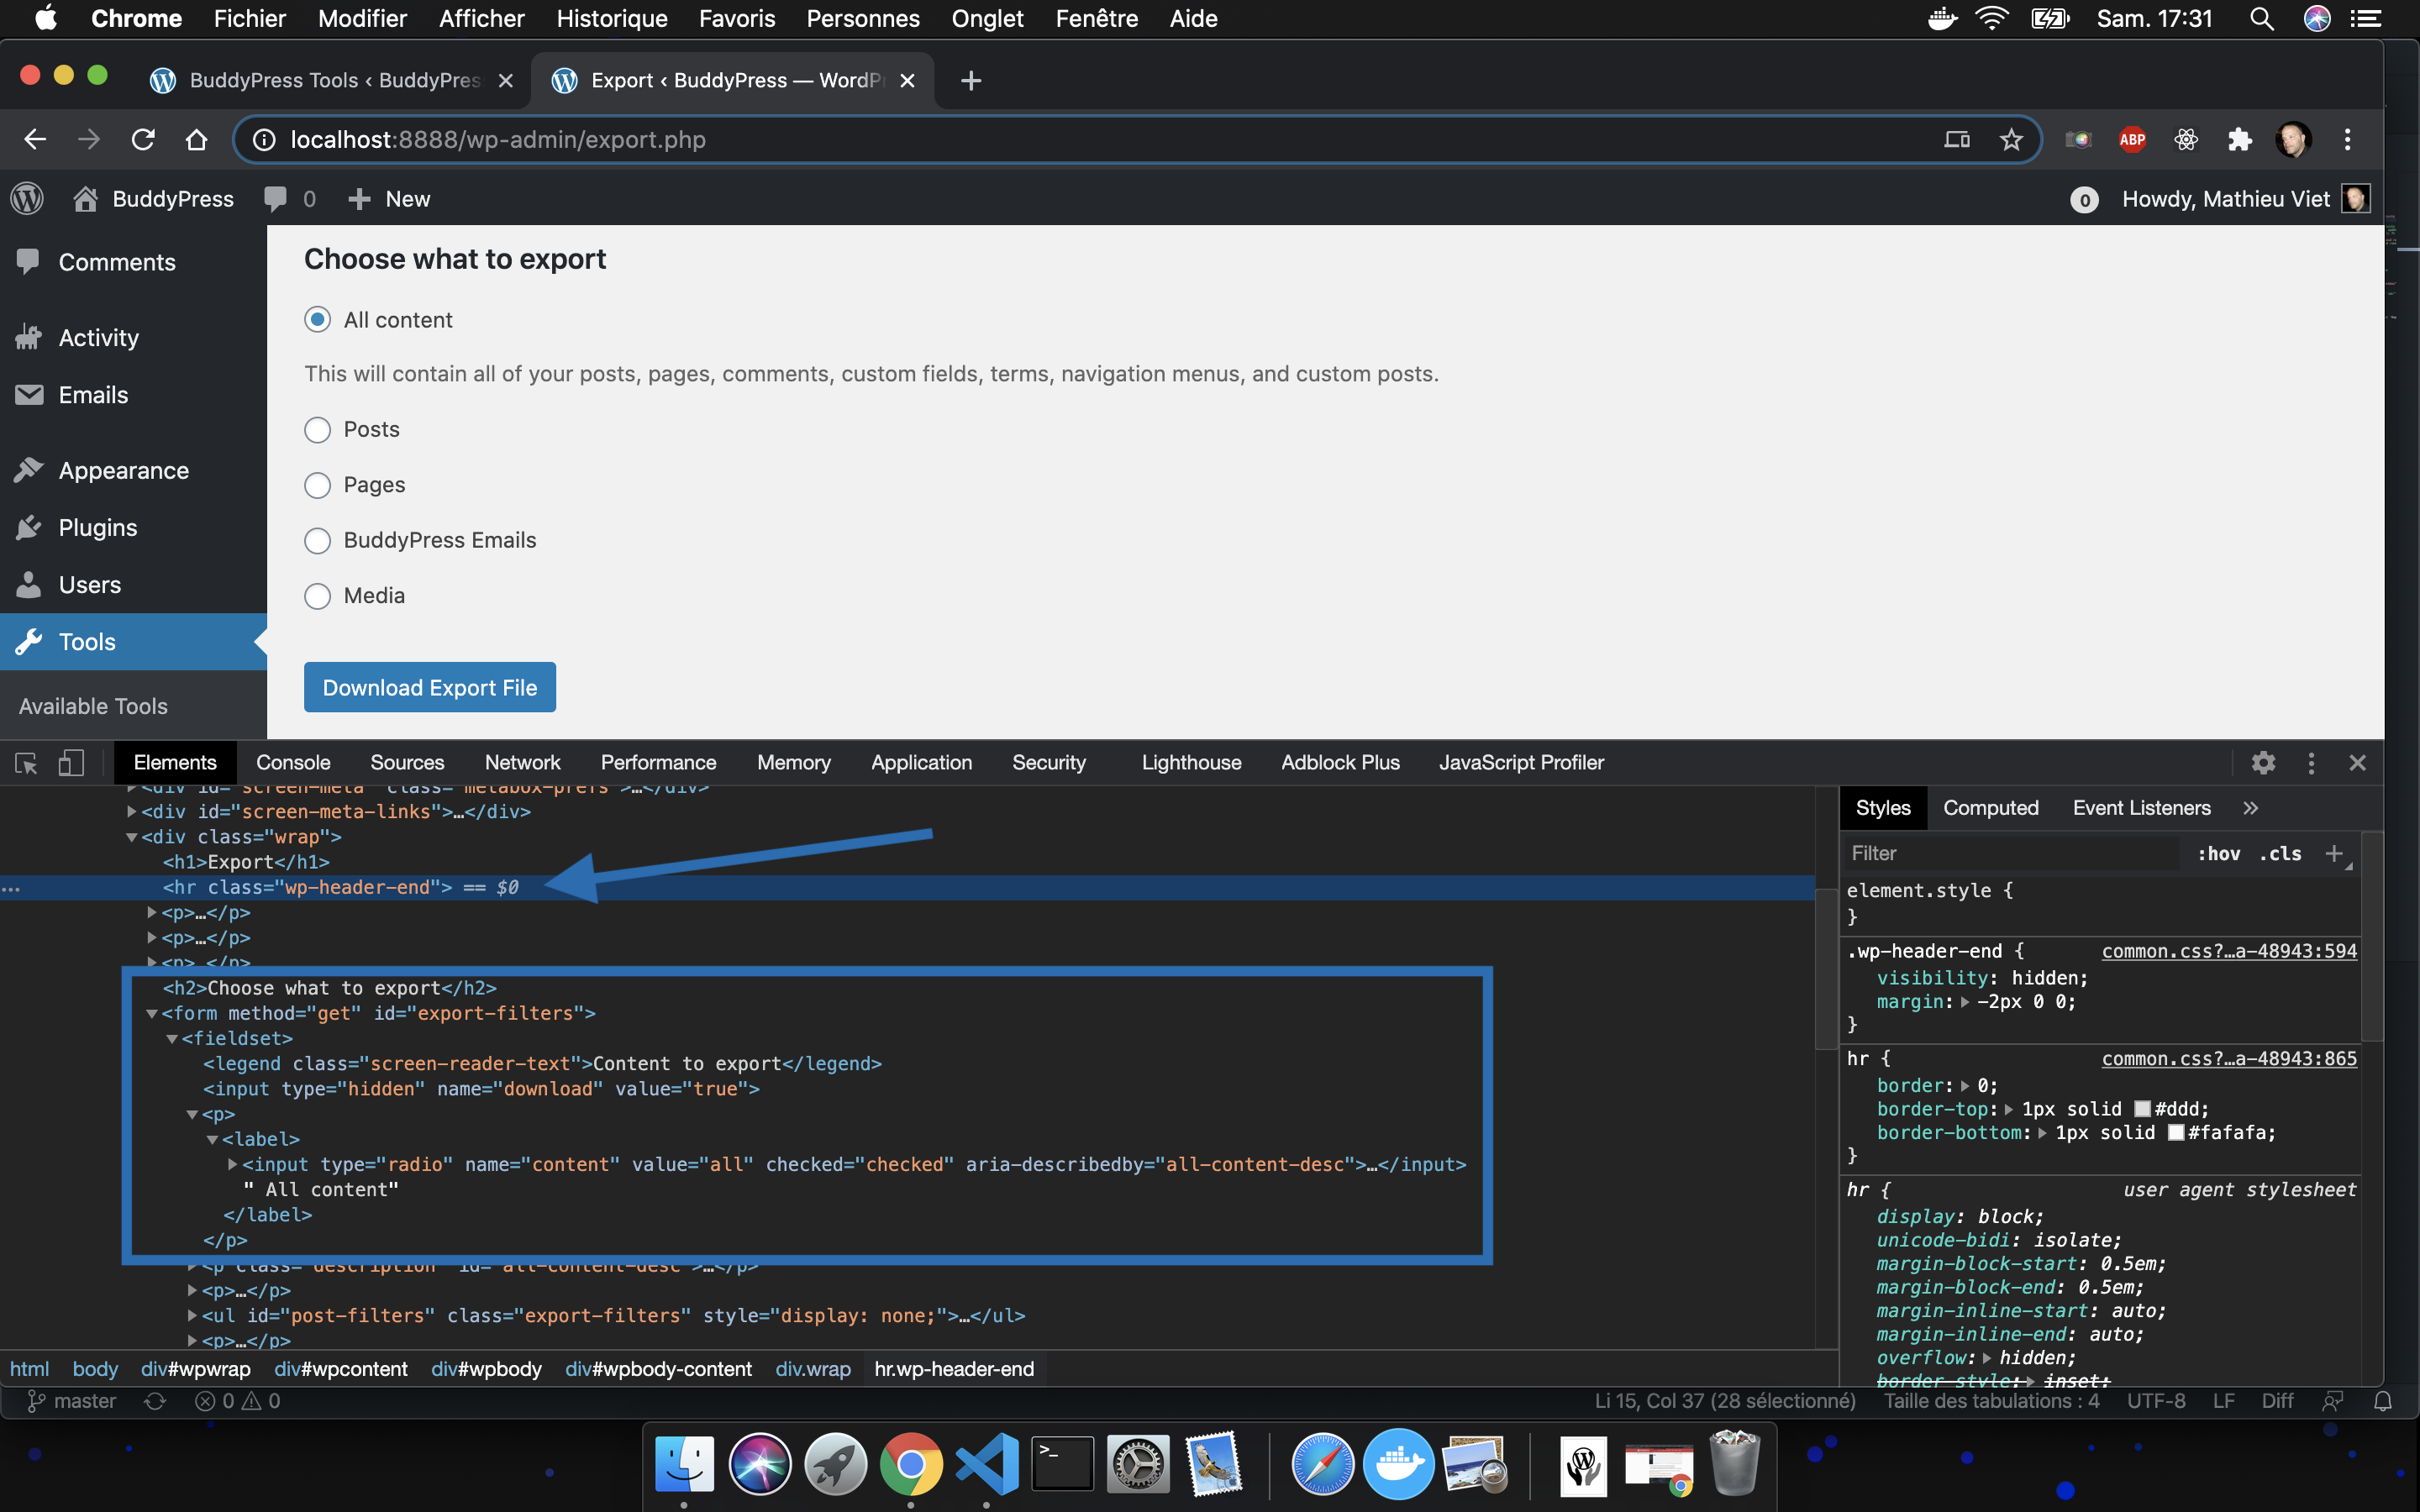
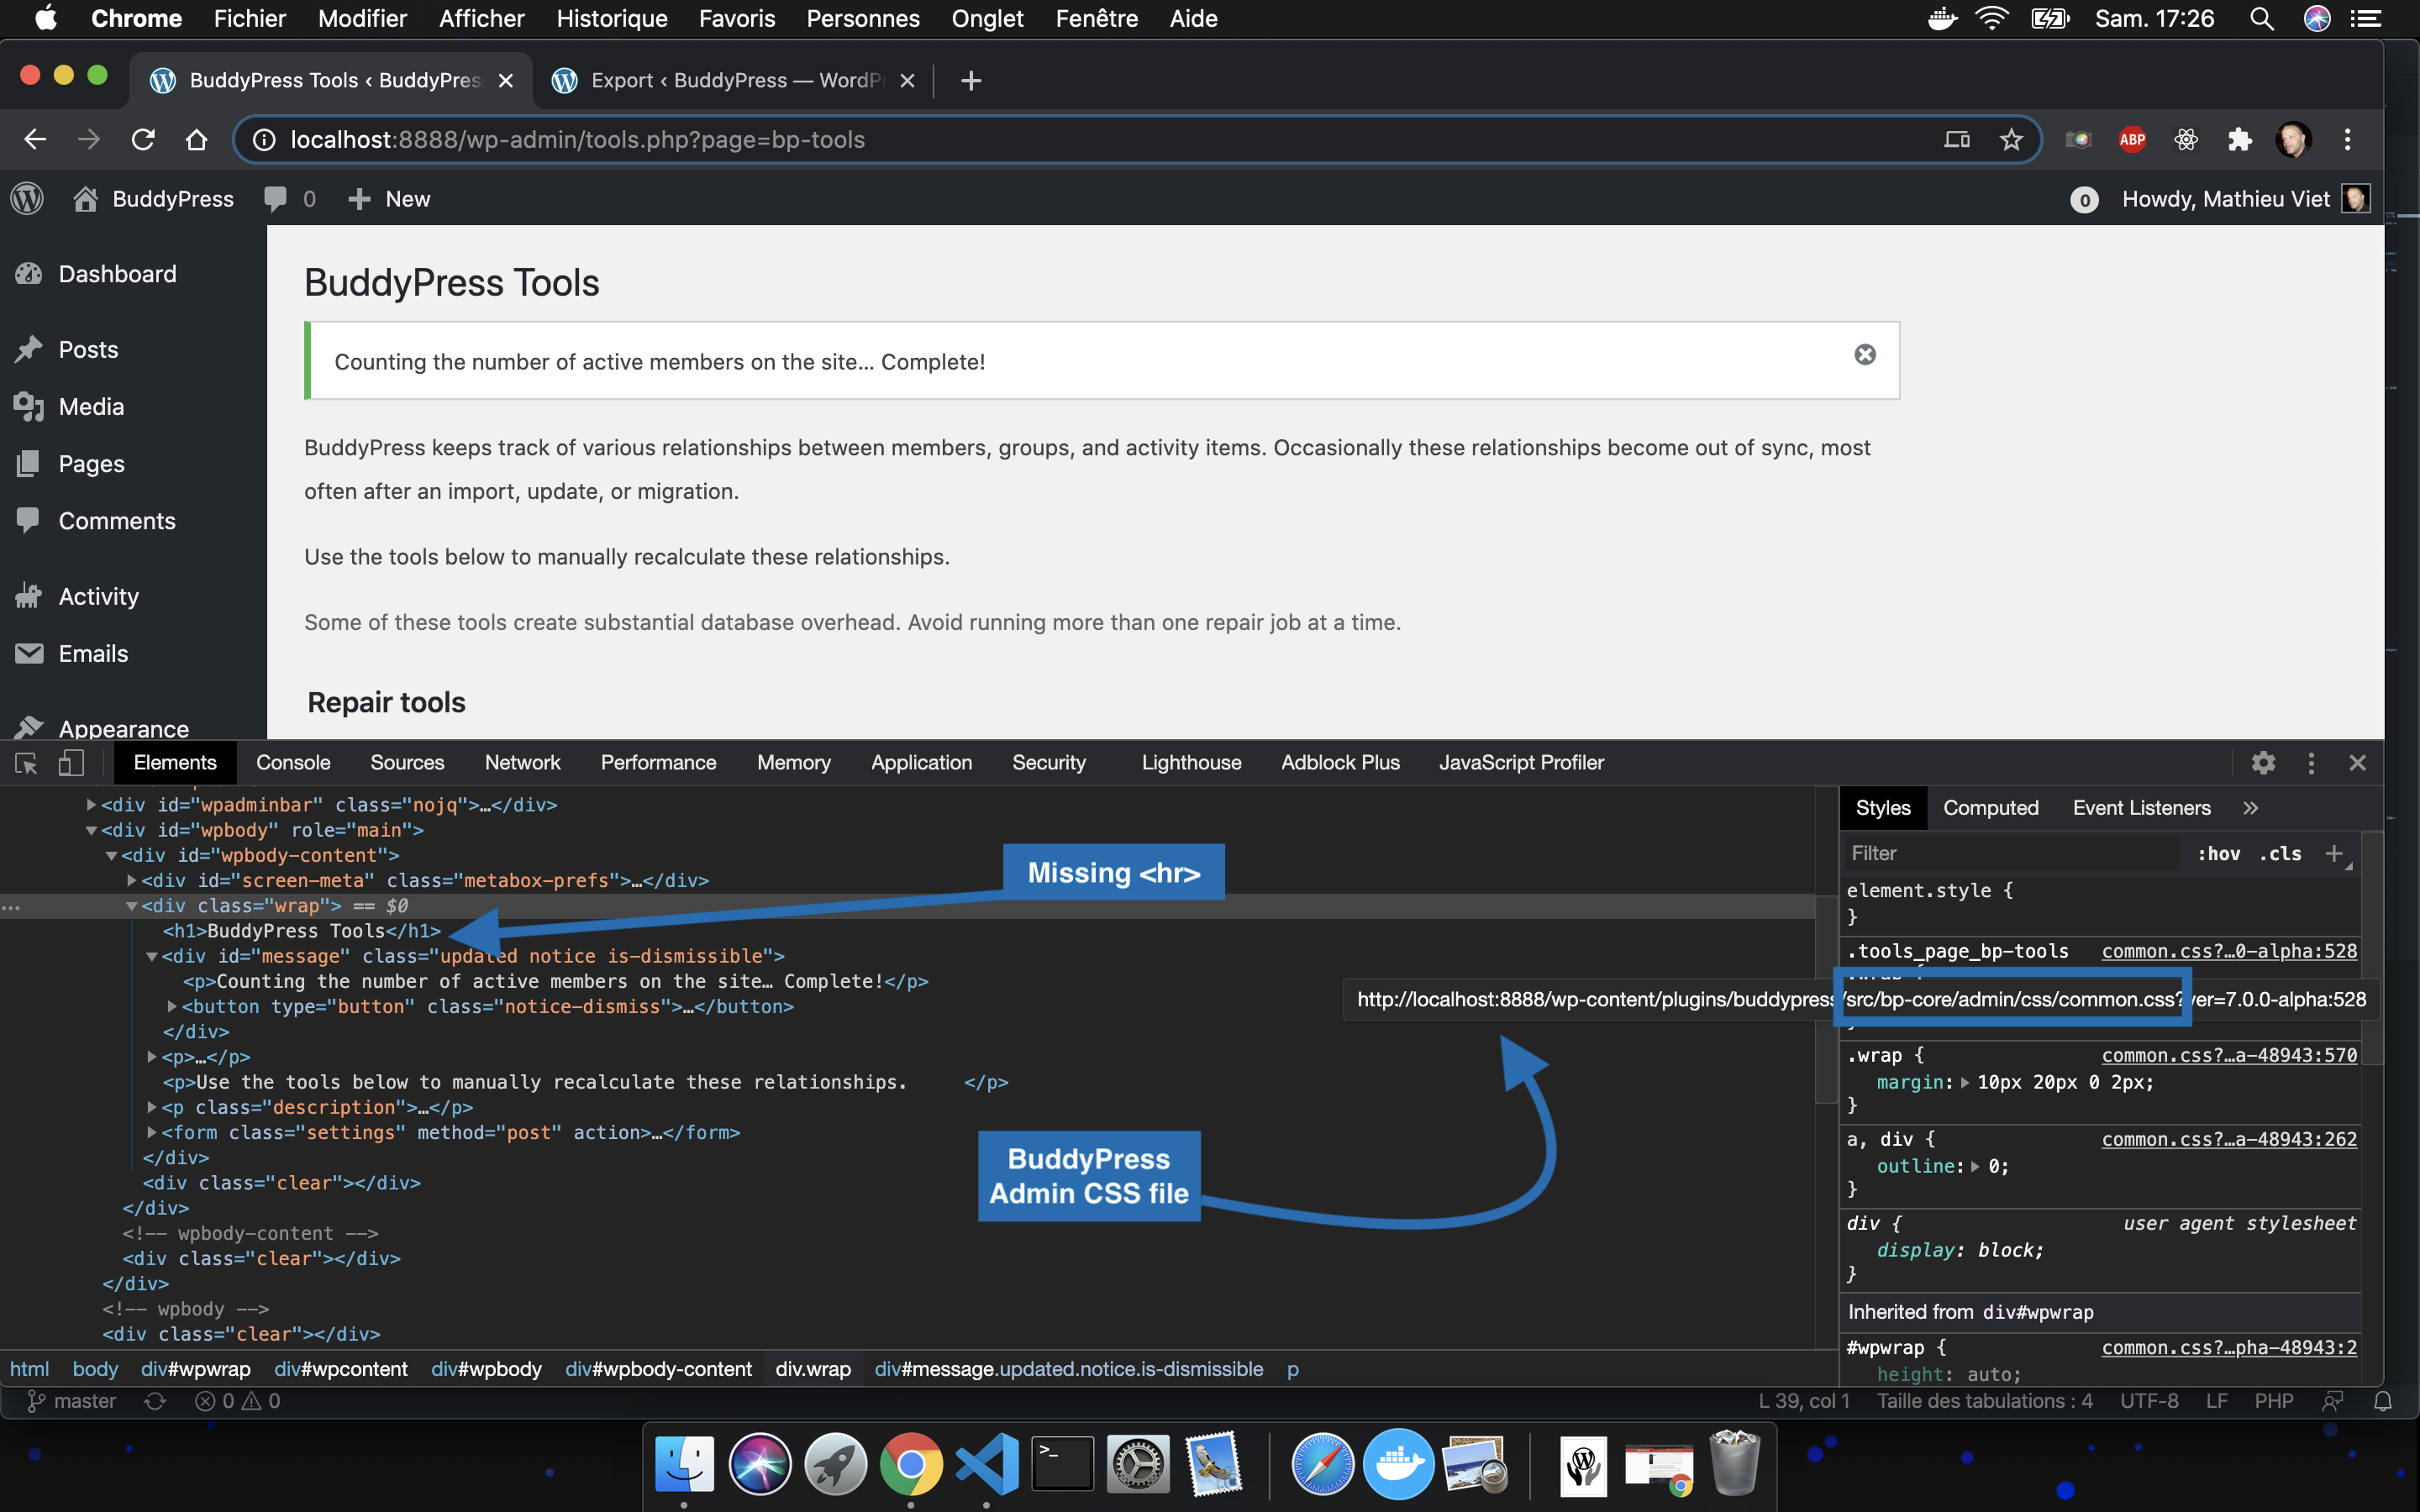
If you look deeper using your Web browser software’s inspector and comparing the BuddyPress tools administration screen (image on the right) with another WordPress tools administration screen (image on the left), you’ll see HTML output [1] needs to be edited as well as the src/bp-core/admin/css/common.css file [2].
[1] You can see that compared to other administration screens, an hr tag is missing under the main title located into the h1 tag. Now if you compare the form structure with the one available into the WordPress Export tool, you can see it’s improvable. Let’s add an h2 tag to visually inform the users about what they need to do to select one or more tools and use the legend tag to inform screen readers about what to expect from the checkboxes. You can also wrap the checkboxes into a paragraph tag.
[2] If the notice message has a bigger height and a smaller width, it’s due to the BuddyPress Admin CSS file that is restricting the content’s width of the wrapper to 950 pixels max and is using a bigger line-height for paragraphs.
Editing the code to fix the issue into your BuddyPress local repository
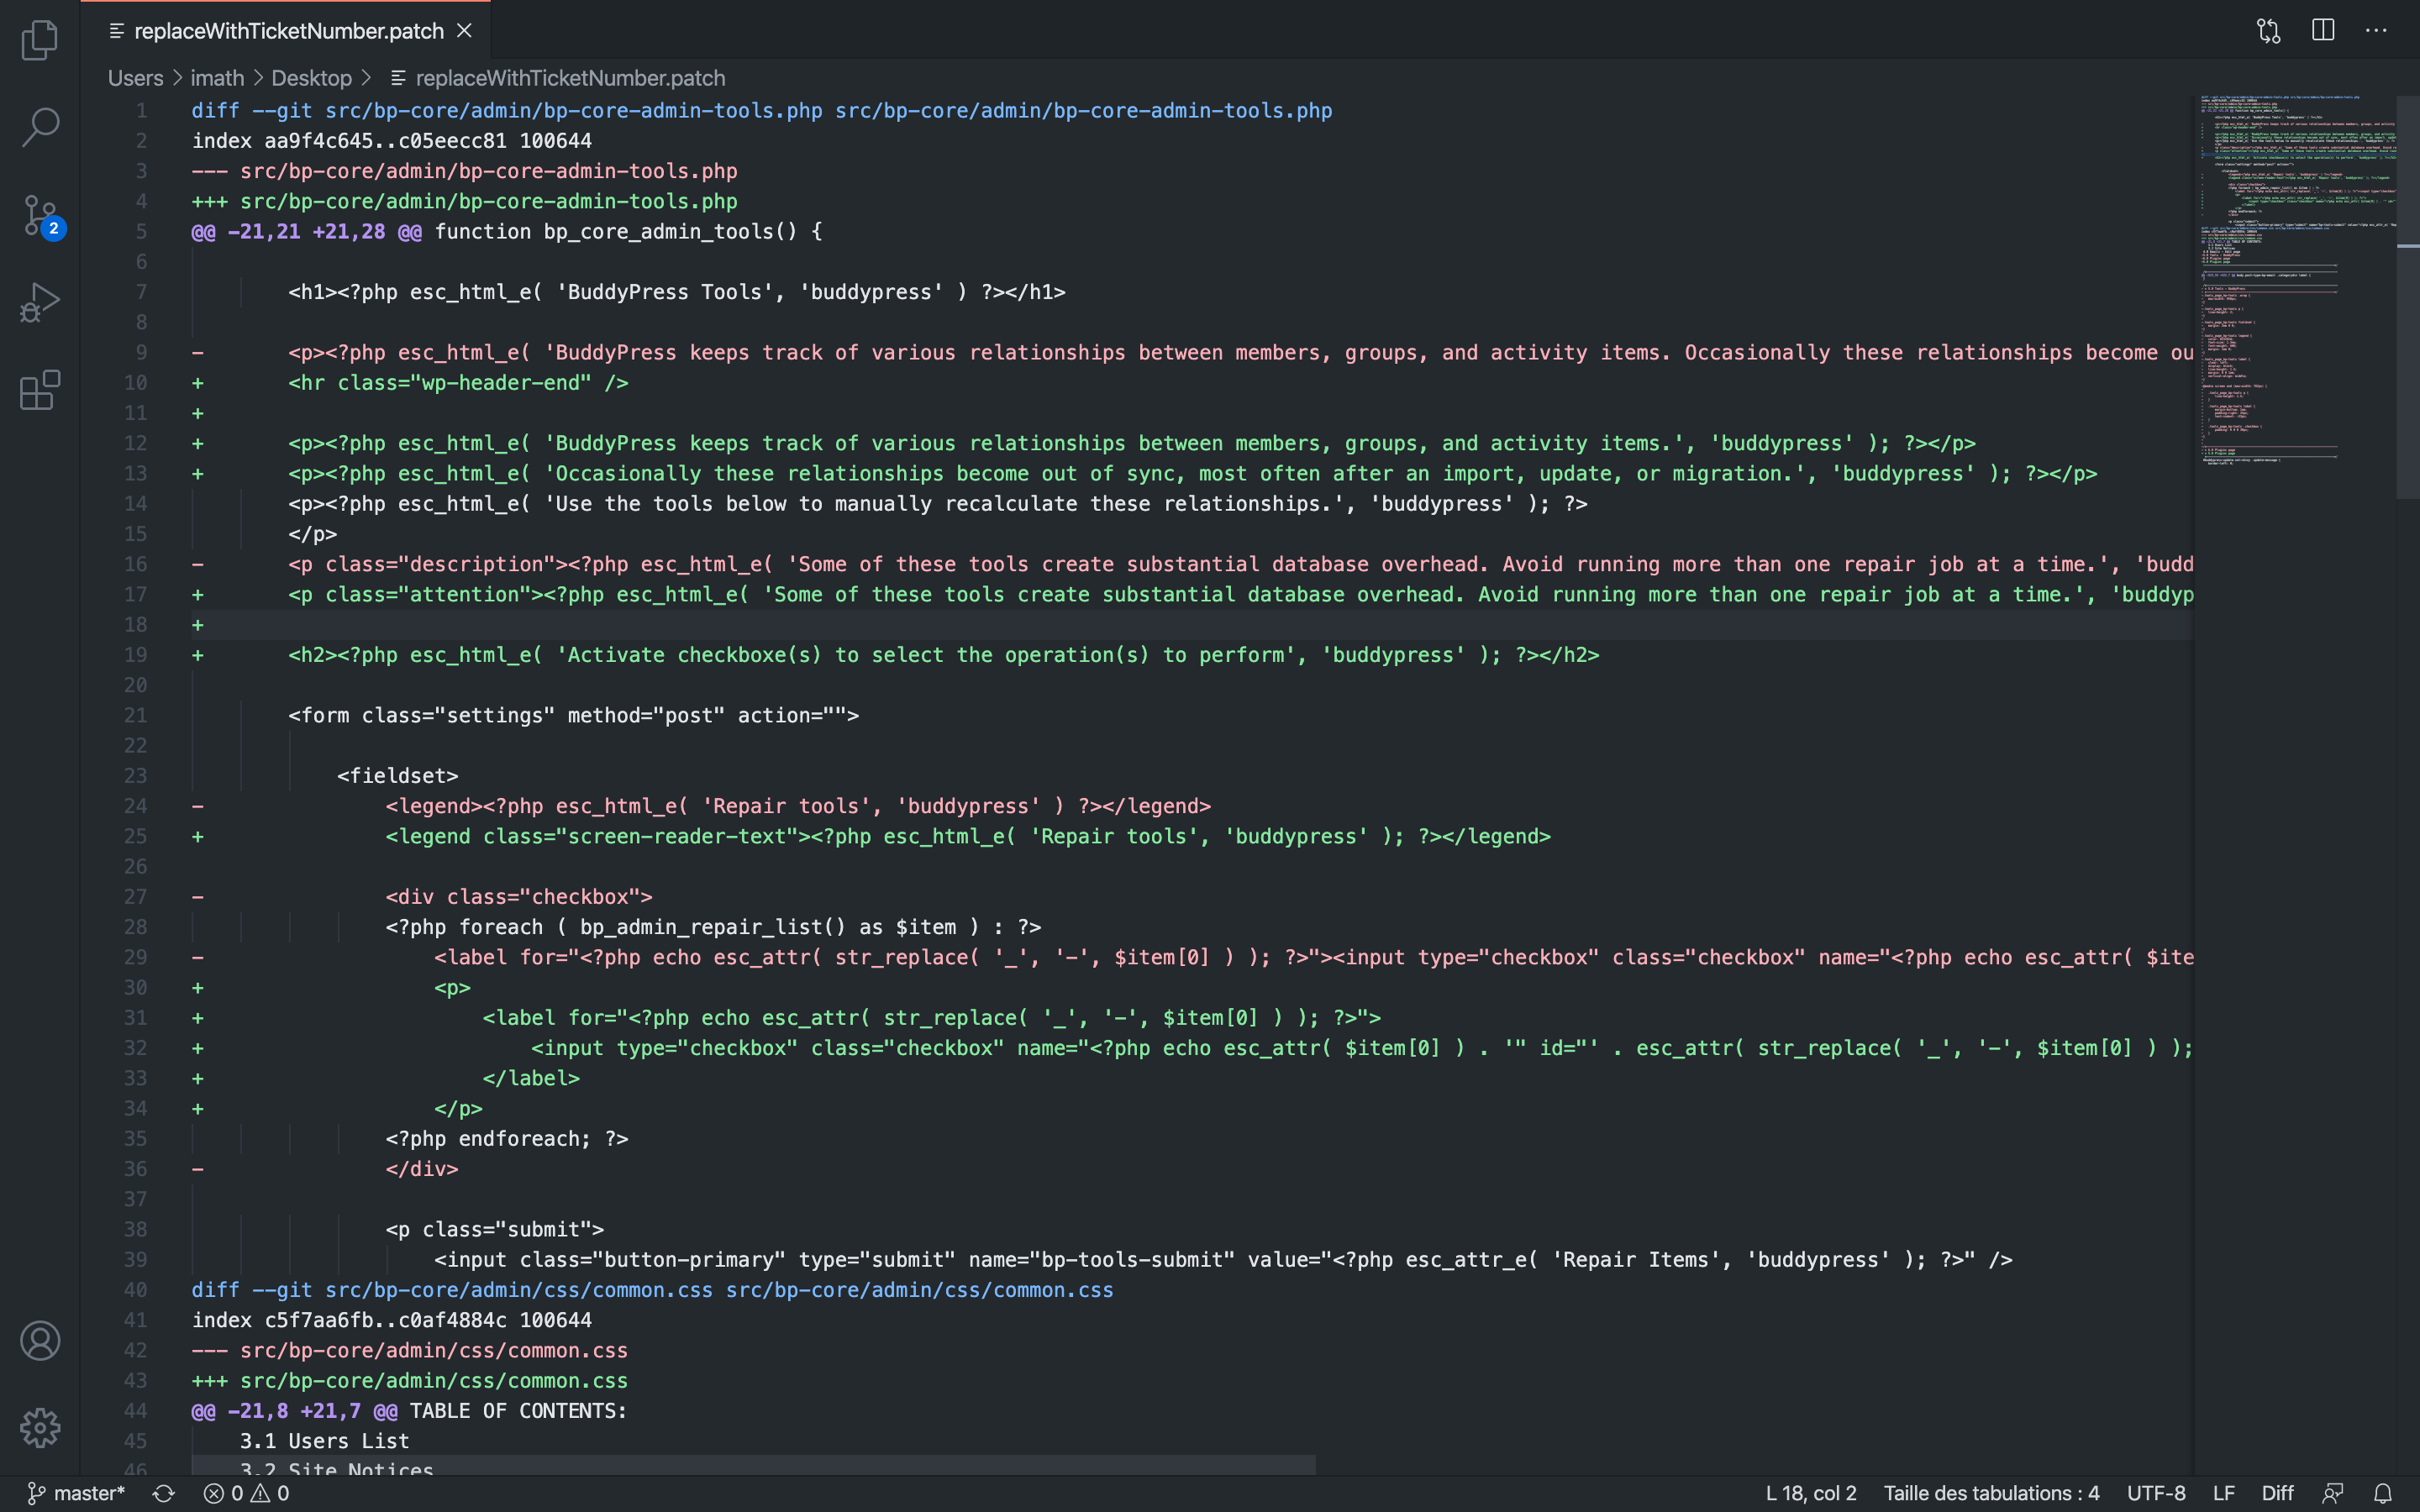
The content of the BuddyPress tools administration screen is generated by the bp_core_admin_tools() function from the src/bp-core/admin/bp-core-admin-tools.php file.
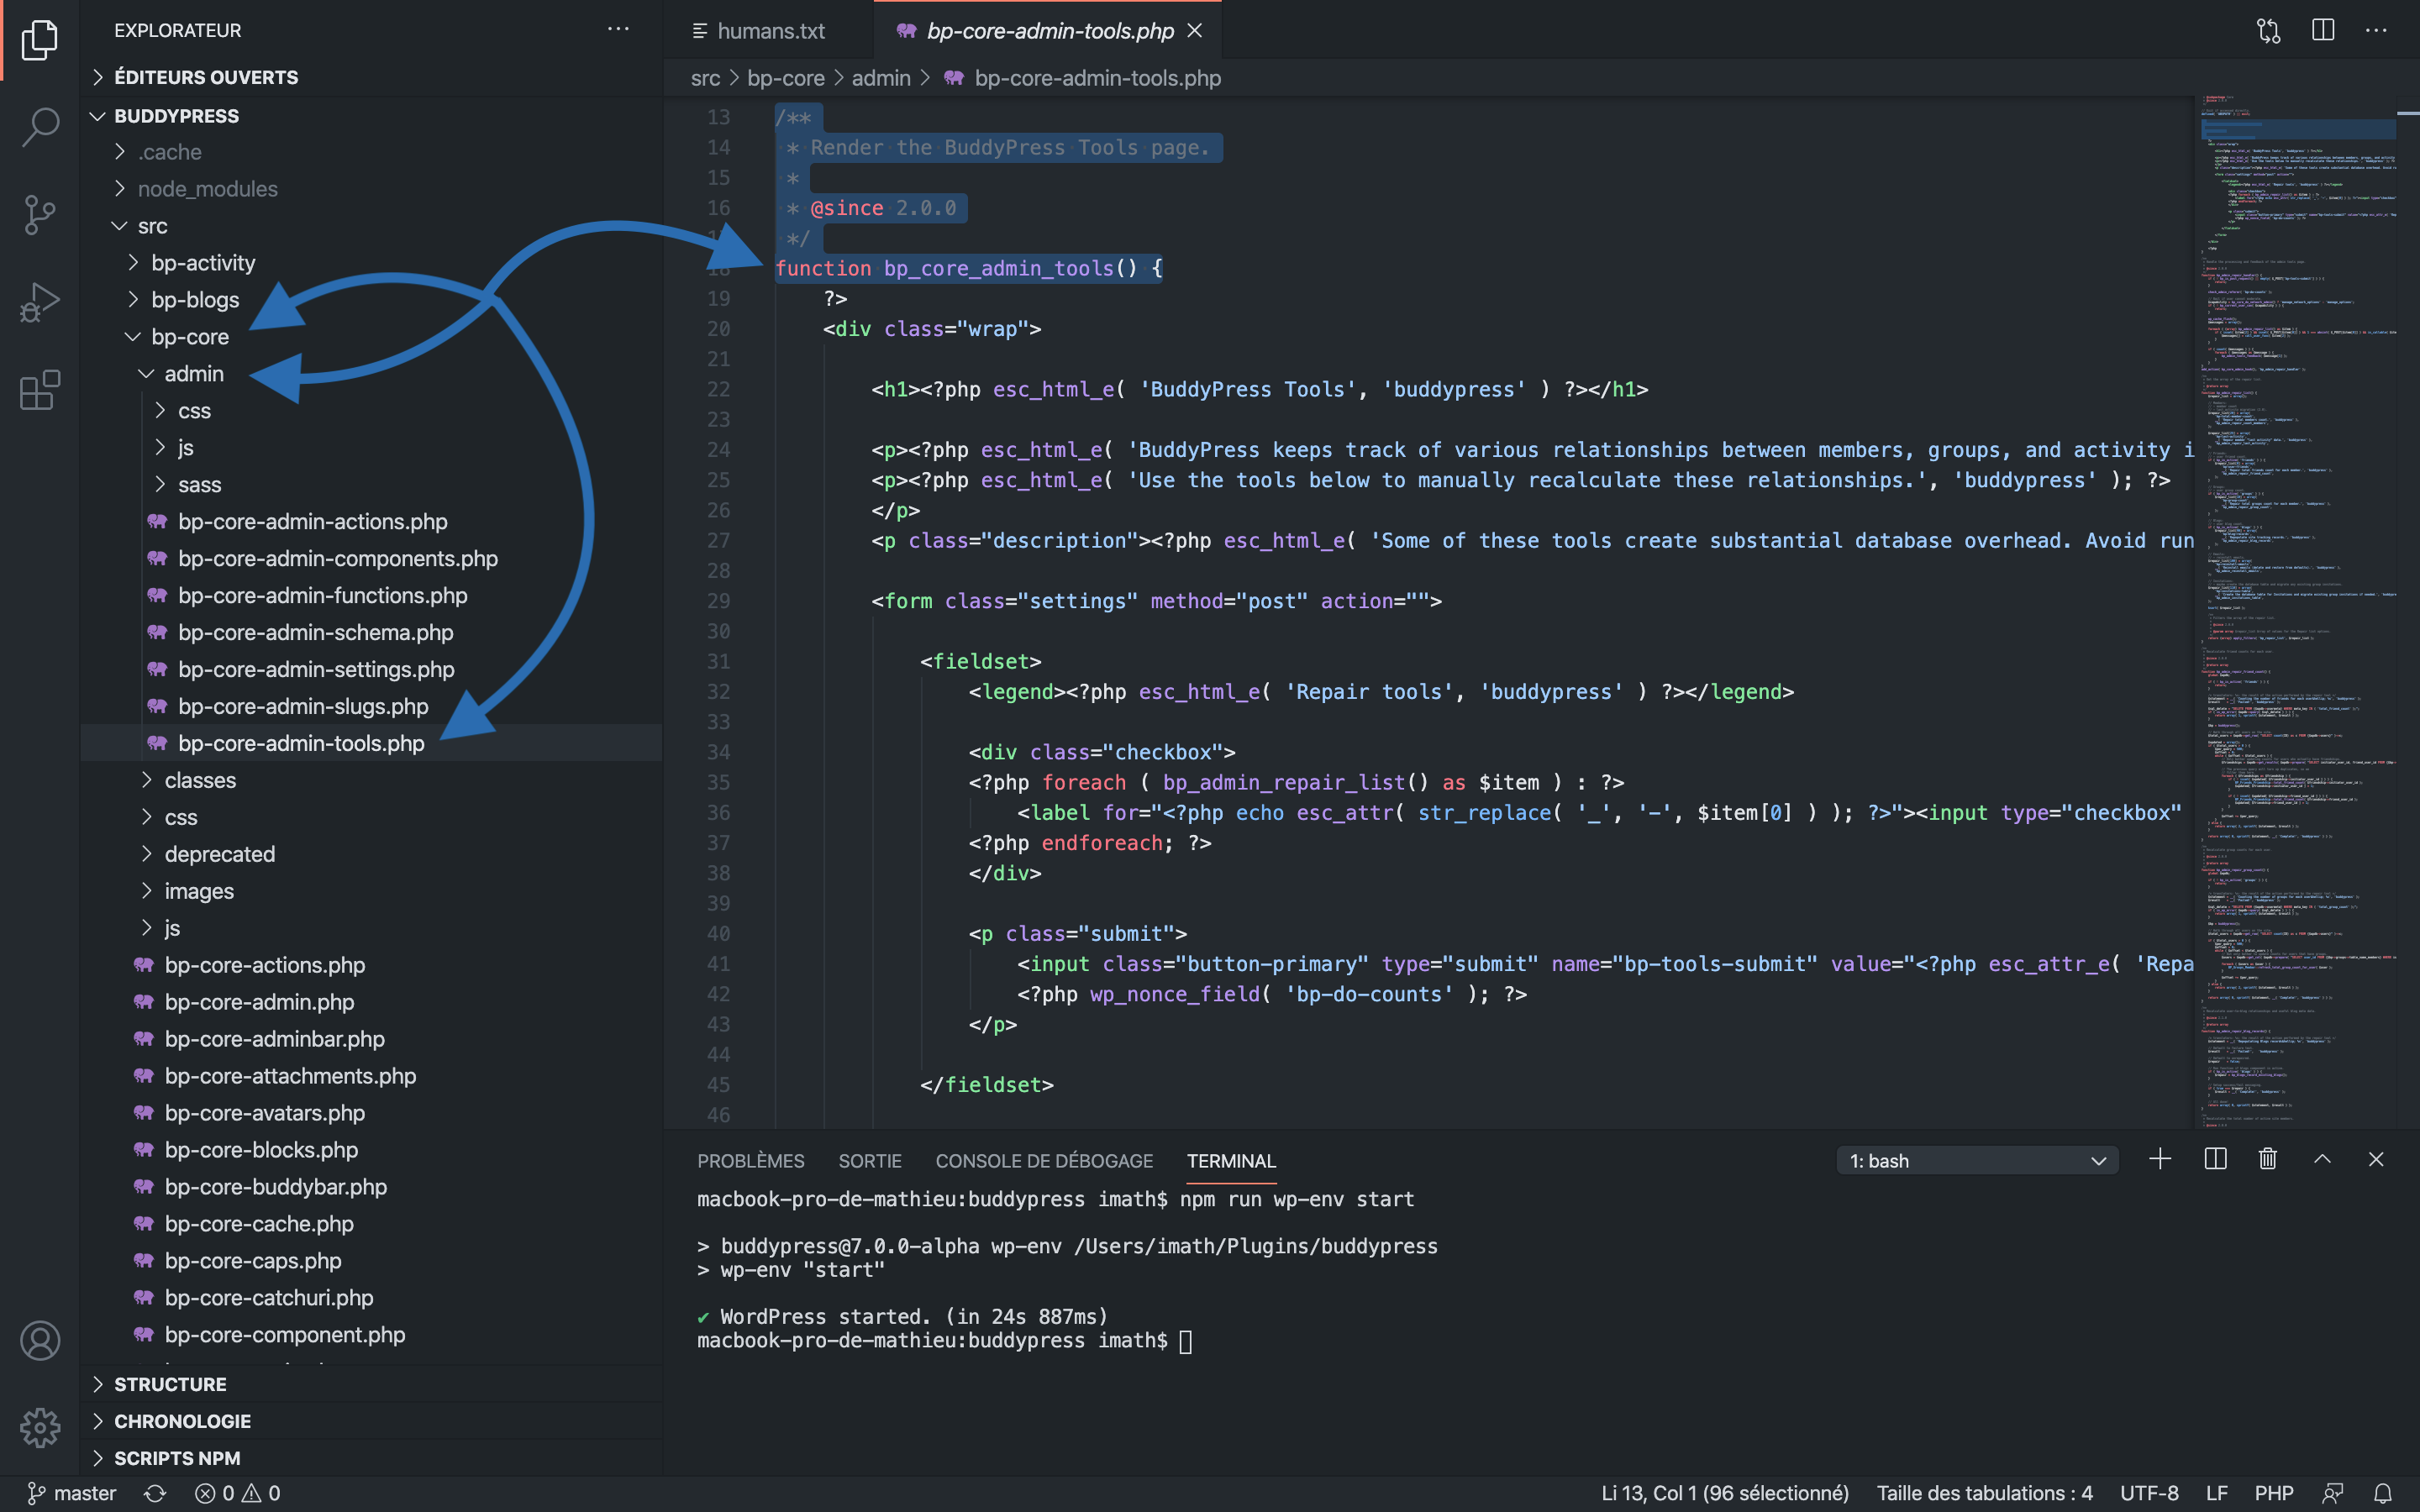
To successfully warn the administrator about the potential database overhead that may happen if you run more than one tool at a time, you could use the attention CSS class instead of the description one that is used. You should also add the hr tag to delimit the end of the page’s header and use a form structure more inline with the WordPress Export tool ‘s screen.
Once edits are saved, let’s check the results into the web browser. You need to reproduce the steps that made you discover the issue.
You still need to deal with the notice presentation: let’s edit the BuddyPress Admin CSS file!
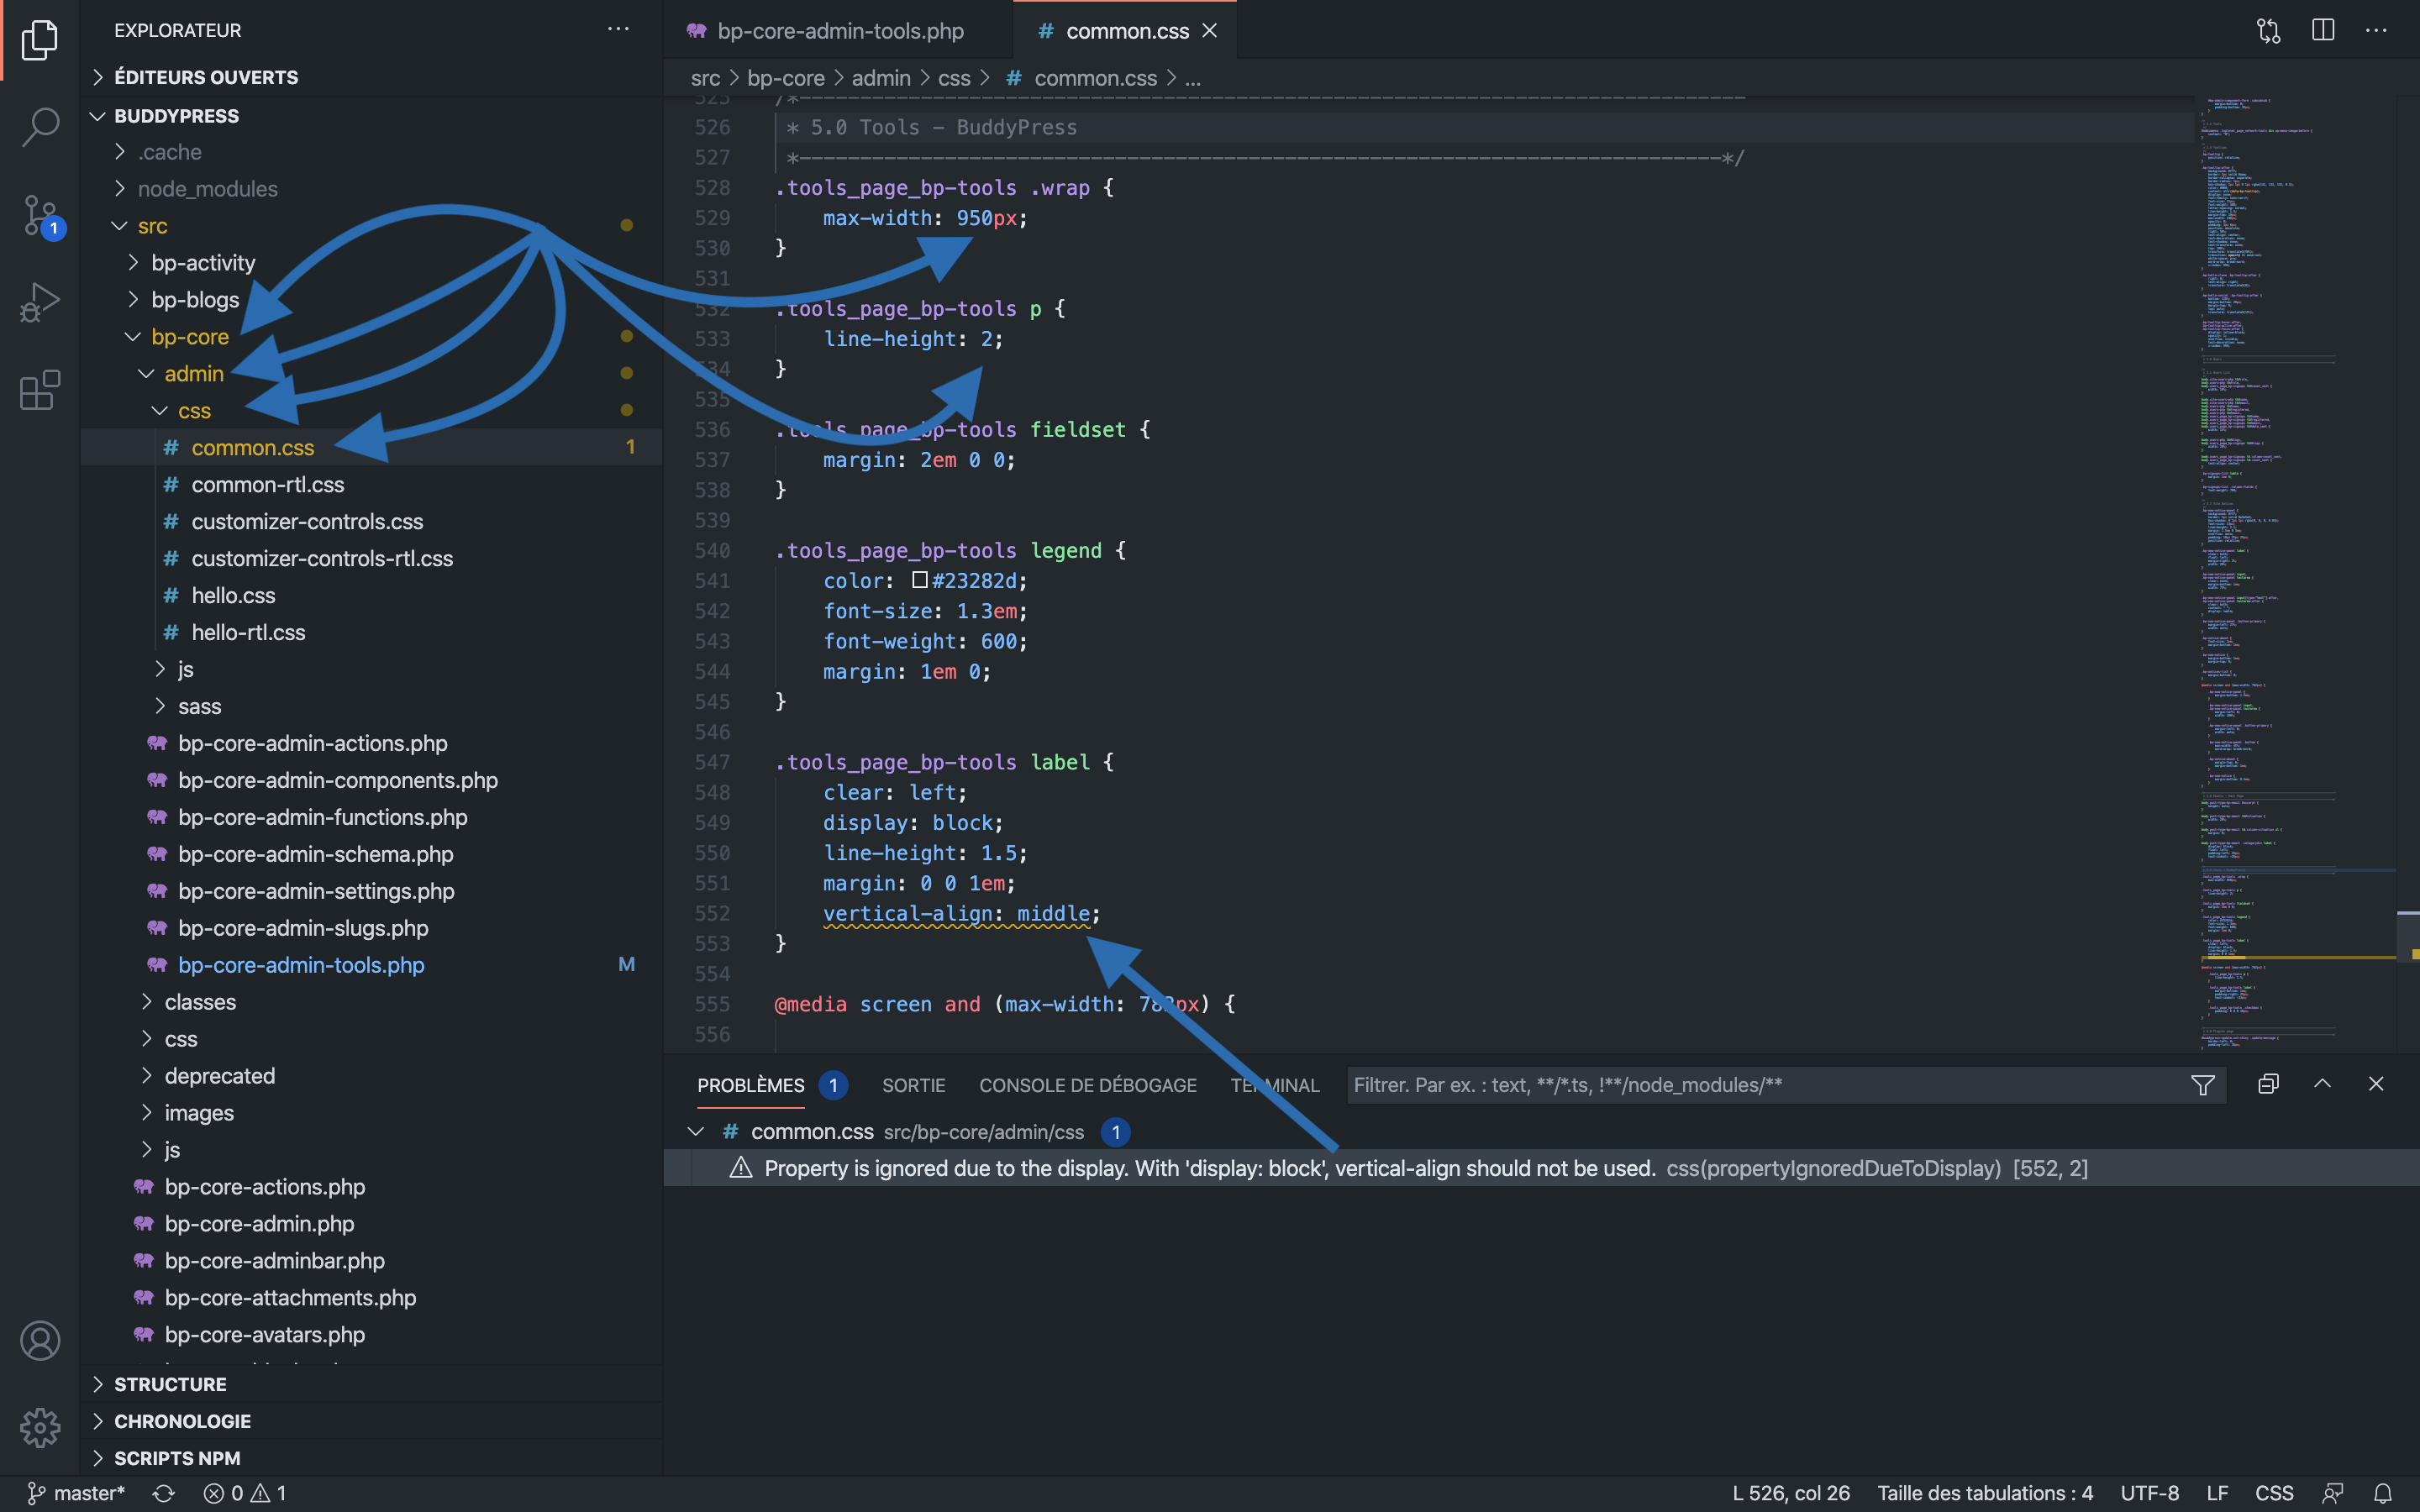
As you’ve edited the HTML output, some CSS rules are not needed anymore and as you’ve seen earlier, you don’t need to restrict the width of the screen’s content wrapper. I believe you don’t need any of the CSS rules of the 5.0 Tools - BuddyPress section actually. So let’s remove it and update the sections numbering.

Generating the patch
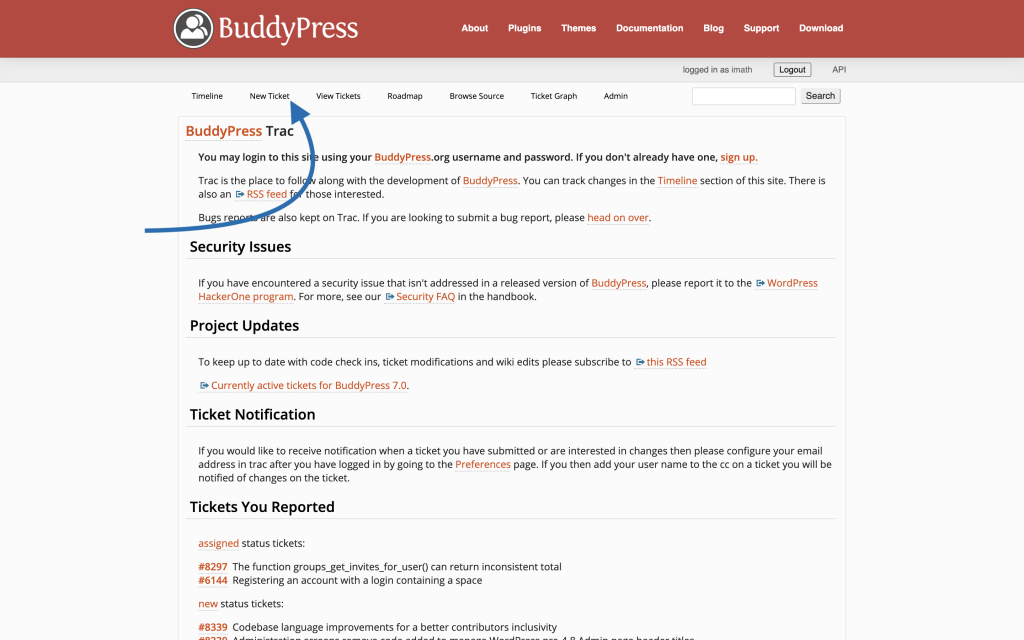
To share your suggestion to fix an issue with the BuddyPress development team, you’ll need to use our Trac (our tool to manage the BuddyPress code source and track BuddyPress bugs).
If you don’t have a WordPress.org account yet, create one as you’ll need to log in the BP Trac to be able to submit tickets.
The patch is a file containing the code you changed compared with the existing code and you’ll use this file as an attachment to the Trac ticket explaining the issue.
Here’s the command to run to create this file:
# SVN
svn diff > ~/Desktop/replaceWithTicketNumber.diff

# Git
git diff --no-prefix > ~/Desktop/replaceWithTicketNumber.patch
NB: the --no-prefix option of the Git command is important so that people using SVN can apply your patch. If you want to avoid adding this option each time you create a patch, you can customize your Git configuration this way:
git config --global --bool diff.noprefix true
Here’s how the diff file should look like if you open it into your code editor:
Now you’ve created the patch, you need to clean things up so that next time you synchronize your local copy of the BuddyPress repository you don’t get errors. To do so, run the following command:
# SVN
svn revert -R *

# Git
git checkout .
Sharing your ticket on BuddyPress Trac
Now you have your patch ready and you cleaned your local copy of the BuddyPress repository, you can write a ticket about it to inform the BuddyPress development team about your great contribution. Head over to the BP Trac’s page to submit your ticket to do so.

Into the summary field, insert a short description of your issue. Use the Description multiline text field to detail your issue making sure to inform about the steps to reproduce it and eventually the specific configuration to use to reproduce it (eg: Multisite with BuddyPress active on a sub site). Don’t forget to add the has-patch keyword to your ticket and to activate the checkbox to attach a file once your ticket will be posted. You can include screenshots or any complementary information that can help understanding what your patch will fix once applied.
Submit your ticket and don’t forget to edit the name of your file to match the ticket number you’ll find once the next screen will load.
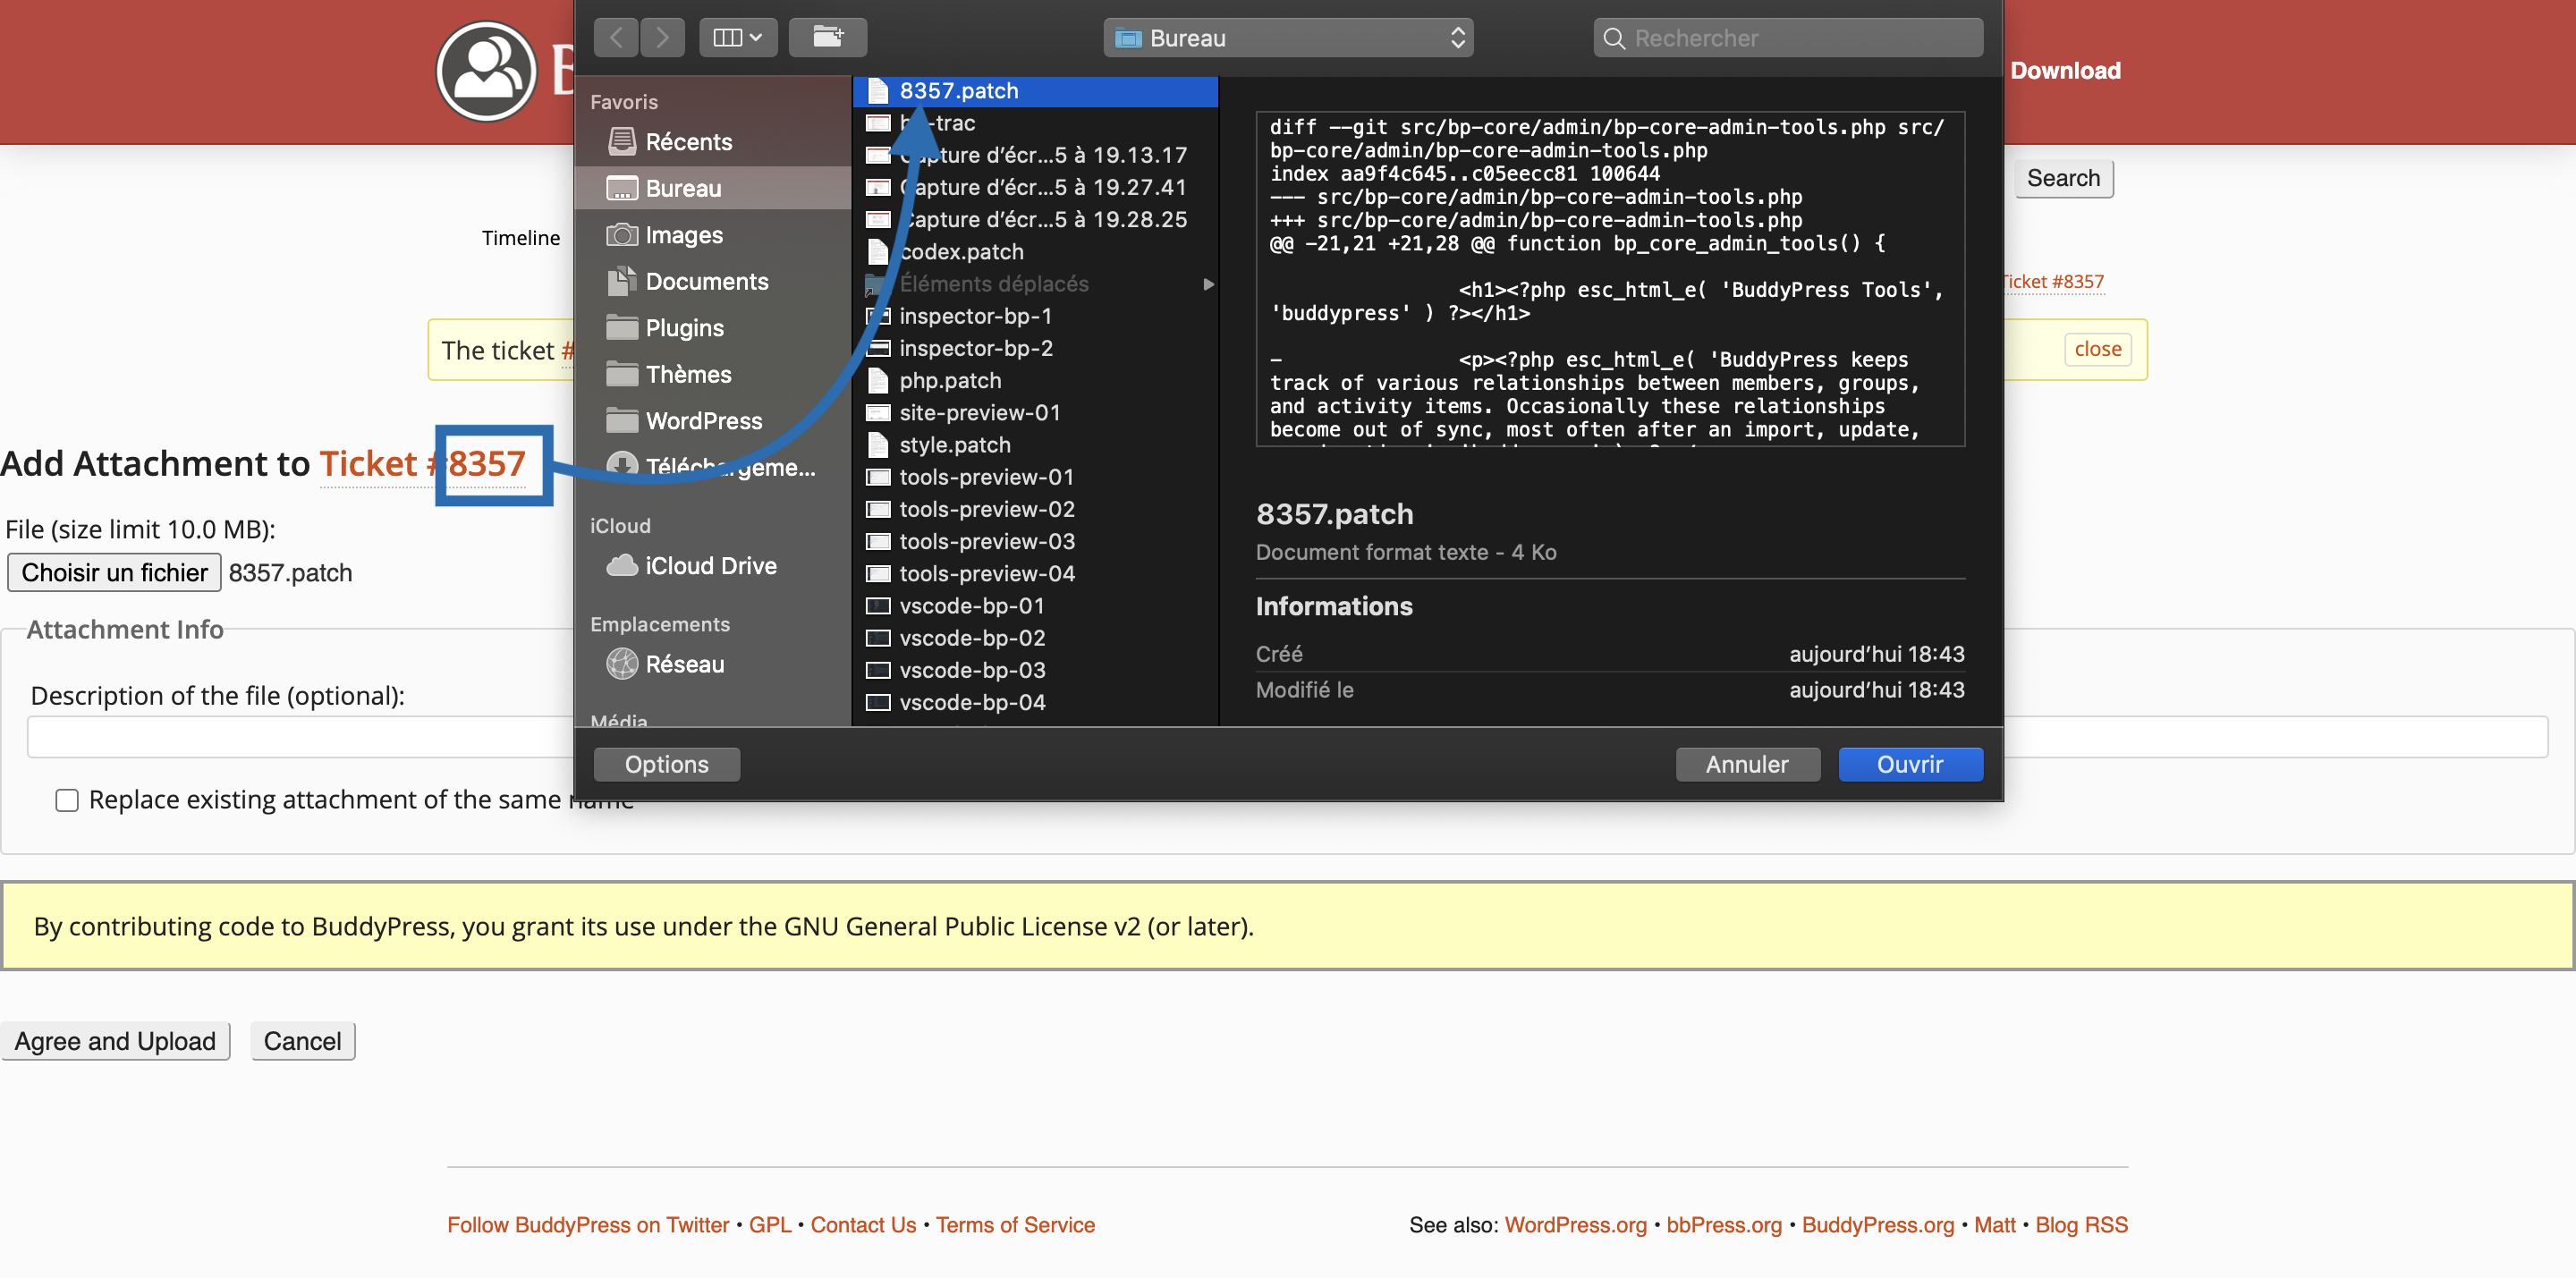
For this patch, the replaceWithTicketNumber.patch file should be renamed to 8357.patch.
Good job so far! You can have a look at the submitted ticket: #8357.
Every time your ticket will be updated (comments, commits, …), you’ll receive an email notification. Discussions about your ticket are likely to happen: eg. BuddyPress developers may ask you to update/edit your patch. You’ll see these discussions can be really interesting and can greatly help you improve your skills.
Applying a patch to your local copy of the BuddyPress repository
There are 2 situations when you’ll need to apply a patch to your local copy of the BuddyPress repository:
- You need to update a patch you previously shared on BP Trac.
- You want to contribute to a patch shared by another contributor and provide him with your feedbacks about it.
In both cases, the commands to run are the same. First from your Terminal software move to your BuddyPress repository’s local copy.
cd ~/Plugins/buddypress
Once there, don’t forget to synchronize your local copy with the central BuddyPress repository.
# SVN
svn up

# Git
git pull origin master
If you installed the GruntJS tool, you simply need to run this command:
grunt patch:8357
8357 is the ticket number (the one that was created in previous chapter).
Otherwise, you’ll need to download the patch from the ticket’s page before applying it.

Once downloaded, whether you use SVN or Git the command to apply the patch is the same.
patch -p0 < /path-to-the-downloaded-patch/8357.patchOnce you finished updating your patch (& possibly generating a new version of it) or testing another contributor’s patch, don’t forget to clean your BuddyPress repository’s local copy.
# SVN
svn revert -R *

# Git
git checkout .
Follow WordPress Coding & Documentation standards
When editing the BuddyPress code source, it’s important your code follows the WordPress Coding Standards. I advise you to check them often as they can be updated. Here are the coding standard links:
For the inline documentation (for Classes, hooks and functions DocBlocks) you might use into your code, it’s also important to use these WordPress standards:
Congratulations! You are now ready to contribute to the BuddyPress code source. If you’re looking for issues to fix, check our roadmap and click on the “active” link of the latest milestone to discover what we need to do 😉