Customizing BuddyPress Avatars
The BuddyPress core allows for a number of ways for you to customize the size and appearance of user avatars. In this tutorial we’ll show you which files to edit in order to make changes to avatars. We’ll also walk through several example customizations.
Default BuddyPress Avatar Sizes
Before customizing avatars, it’s important to know the default values. BuddyPress essentially has two sets of avatar sizes:
-
Thumb – defaults to 50px square
Full – defaults to 150px square
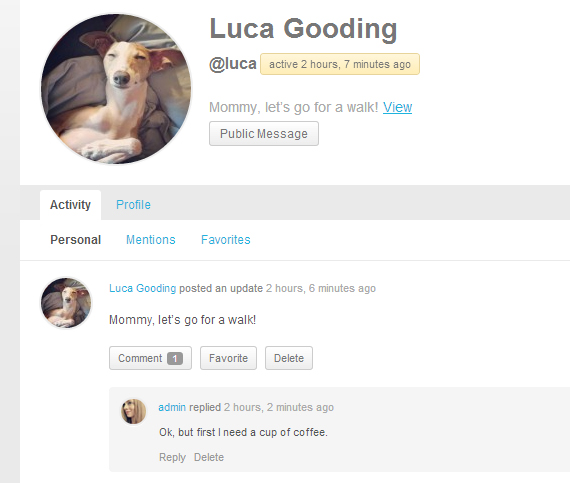
Examples of the 50px thumbnails can be seen in activity stream entries as well as the members/groups directory pages. The full size is used for the avatar displayed on user profile pages.
![]()
How to Change BuddyPress Avatar Sizes
BuddyPress allows for changing the default avatar sizes using a constant. These constants are set up in /bp-core/bp-core-avatars.php. If you want to change their values, you will need to create and/or edit your bp-custom.php file. Here are the available options:
define ( 'BP_AVATAR_THUMB_WIDTH', 50 );
define ( 'BP_AVATAR_THUMB_HEIGHT', 50 );
define ( 'BP_AVATAR_FULL_WIDTH', 150 );
define ( 'BP_AVATAR_FULL_HEIGHT', 150 );
define ( 'BP_AVATAR_ORIGINAL_MAX_WIDTH', 640 );
define ( 'BP_AVATAR_ORIGINAL_MAX_FILESIZE', $max_in_kb );
Let’s walk through a few examples. Perhaps you want to increase avatar sizes across the board. Paste the defines for the thumb and full avatar sizes into your bp-custom.php file and change the values to whatever size you want.
define ( 'BP_AVATAR_THUMB_WIDTH', 80 );
define ( 'BP_AVATAR_THUMB_HEIGHT', 80 );
define ( 'BP_AVATAR_FULL_WIDTH', 250 );
define ( 'BP_AVATAR_FULL_HEIGHT', 250 );
?>
You can also change the size of the original image that BuddyPress stores, as well as limit the file size the users can upload. This is a good idea if you don’t want users to upload insanely large files as avatars. Add this to your bp-custom.php file and change the values to suit your needs. These are example values:
define ( 'BP_AVATAR_ORIGINAL_MAX_WIDTH', 800 );
define ( 'BP_AVATAR_ORIGINAL_MAX_FILESIZE', 200 );
How to Change the Default BuddyPress Avatar
The default avatar is the one that appear when a user has not yet uploaded his own avatar. If you’re not a fan of the mystery man, here are the constants that you can use to define your own:
define ( 'BP_AVATAR_DEFAULT', $img_url );
define ( 'BP_AVATAR_DEFAULT_THUMB', $img_url );
Change the the constant to include the URL for the location of your new default avatars and add this to your bp-custom.php file.
define ( 'BP_AVATAR_DEFAULT', 'http://example.com/default-avatar.jpg' );
define ( 'BP_AVATAR_DEFAULT_THUMB', 'http://example.com/default-avatar-thumb.jpg' );
To use a default avatar without Gravatar you should also add:
add_filter( 'bp_core_fetch_avatar_no_grav', '__return_true' );
To continue using Gravatar you should add:
add_filter( 'bp_core_avatar_default', function() {
	return BP_AVATAR_DEFAULT;
} );
How to Customize BuddyPress Avatars With CSS
When using CSS to manipulate BuddyPress avatars, the most important thing to remember is that you always want to size down from the full or the thumbnail size. If you use CSS to try to size avatars up to a larger size, you will get fuzzy, distorted avatars.
The default BuddyPress theme adds ‘avatar‘ class to BuddyPress avatars. You can target this class within your BuddyPress child theme in order to make customizations to avatars. For example, let’s say that you want to make all the avatars circles. You might add something like this to your theme’s stylesheet:
img.avatar {
-webkit-border-radius: 50%;
-moz-border-radius: 50%;
-ms-border-radius: 50%;
-o-border-radius: 50%;
border-radius: 50%;
-webkit-box-shadow: 0 1px 0 #fff;
-moz-box-shadow: 0 1px 0 #fff;
box-shadow: 0 1px 0 #fff;
}
All of your BuddyPress avatars will now be circular:
Using Firebug you can determine even more specific classes to target. For example, if you only wanted to change the shape of the main avatar on user profile pages, you could target it using the div#item-header-avatar img.avatar selector instead.
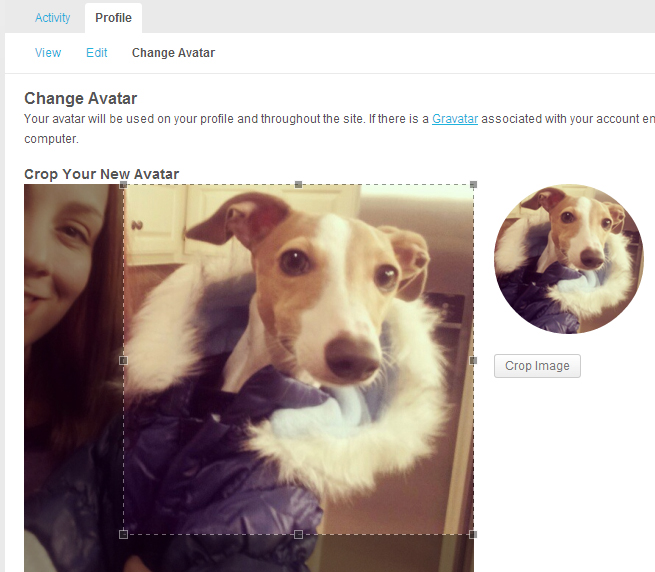
If you implement circular avatars, you may also want to change the shape of the crop pane that is displayed when users are uploading and cropping a new avatar. This CSS, added to your child theme, will change the crop pane to be a circle so that users can accurately preview the new avatar:
#avatar-crop-pane { border-radius: 50%; }
The result will look something like this:
Please note that these examples are applicable to a child theme of the default BuddyPress theme. If you’re working with another theme, the classes may be different but the process is the same.
How to Disable Avatar Uploads
Disabling avatar upload for your BuddyPress site is very easy. Navigate to Dashboard >> Settings >> BuddyPress >> Optionss tab and uncheck the box that says “Allow registered members to upload avatars”.
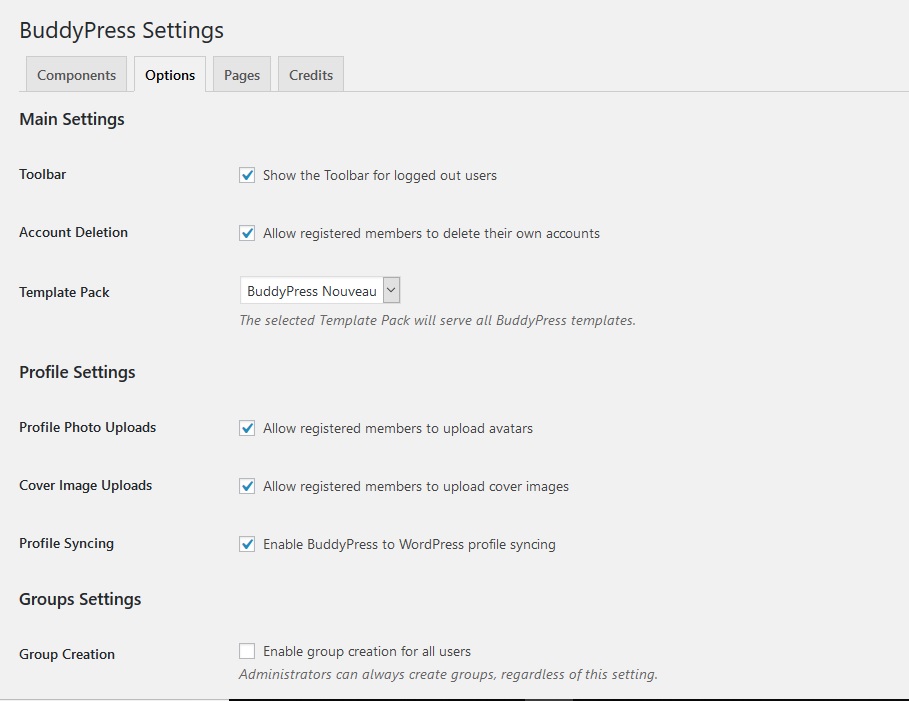
Disabling uploads will still allow for Gravatars. Support for this service is built in, so your users can still have avatars. While disabling avatar upload limits users’ ability to customize their profiles, the advantage for you is that Gravatar hosts all of the avatars.